Wondering why network bandwidth on Windows is restricted? Want to increase bandwidth on Wi-Fi/ Ethernet? Yes, then you are in the right place. In this blog, you will learn how to change the bandwidth limit on a PC. Here we will explain ways to improve bandwidth on Windows 10.
Fact Check – To ensure system activities like Windows update, license checking, etc work properly Microsoft limits network bandwidth to 80%. Due to this when downloading a large file, you face issues. But remember, Microsoft does this to keep your data and system safe from zero-day exploits and malicious hackers.
However, if you want to overcome this problem and limit reservable bandwidth on Windows 10, you will need to read the post till the end.
Ways to Increase Ethernet and Wi-Fi Internet Speed – Windows 10
Slow internet speed for Windows 10 users is a common problem. To resolve this issue, they make changes to router settings, even change the connection but nothing helps. Do you know why this happens?
Microsoft’s latest operating system to deliver faster Windows updates uses a bit of data due to which the bandwidth is restricted. Therefore, to increase internet bandwidth, making changes to Windows settings is required. In this article, we will discuss what these changes are and how to make them increase internet bandwidth.
But, before getting into details, we suggest taking a complete backup of important files. For this, you can use Right Backup – the best multi-platform cloud backup tool.
Disclaimer: A corrupt or invalid registry key/entry can make the system unusable, therefore before making any changes to Windows Registry or Group Policy Editor make sure you have a backup of Windows Registry and a system restore point is in place. This will help avoid any unforeseen situation that may occur due to modifying registry settings.
Ways to Increase Bandwidth on Windows 10
A. Turning Off Windows Update Delivery
To deliver uninterrupted Windows updates, bandwidth is reserved due to which the problem of slow internet occurs. To resolve this, disabling Windows Update Delivery is recommended. To do so, follow the steps below:
1. Press Windows + I > Update & Security

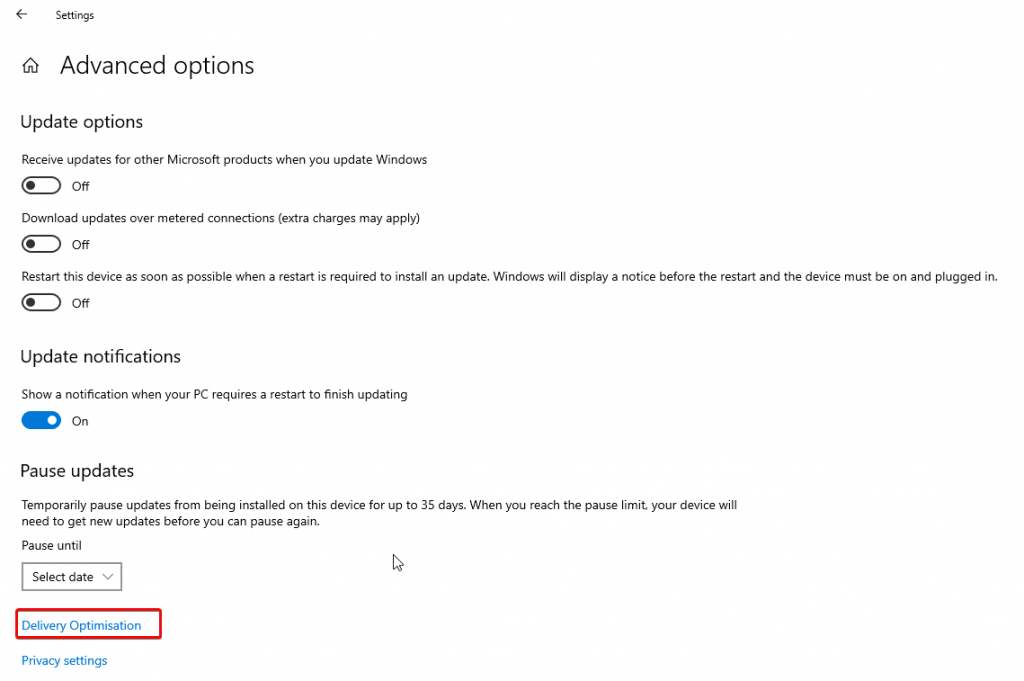
2. Click Advanced options in the right pane.
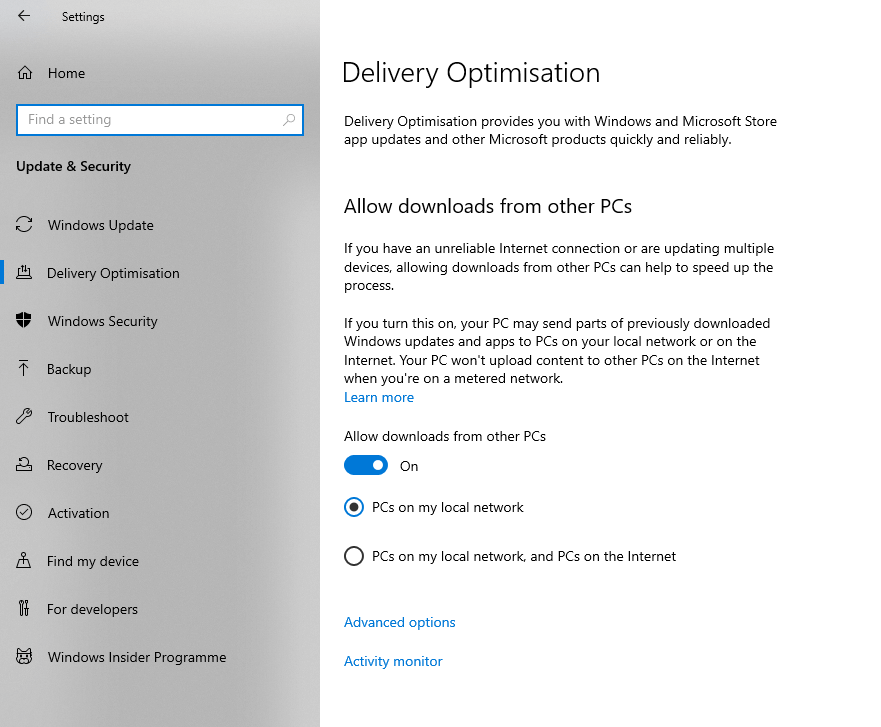
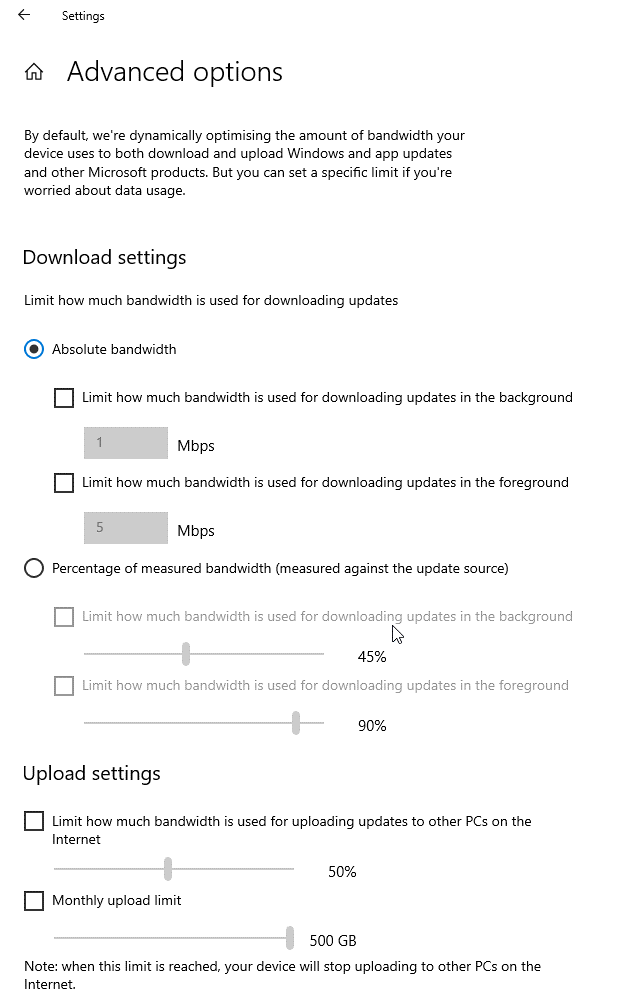
3. In the next window, click Delivery Optimisation > Advanced options,> under Absolute bandwidth > limit how much bandwidth is used for downloading updates in the background
B. Using Group Policy Editor
For Windows 10 or Enterprise users, the most effective way to alter default settings for reservable bandwidth is through Group Policy Editor. To access it, you need to follow the steps below:
1. Press Windows + R
2. Type gpedit.msc > Ok
3. Click the Computer Configuration option present in the left pane
4. Next head to Administrative Templates > Network > QoS Packet Scheduler
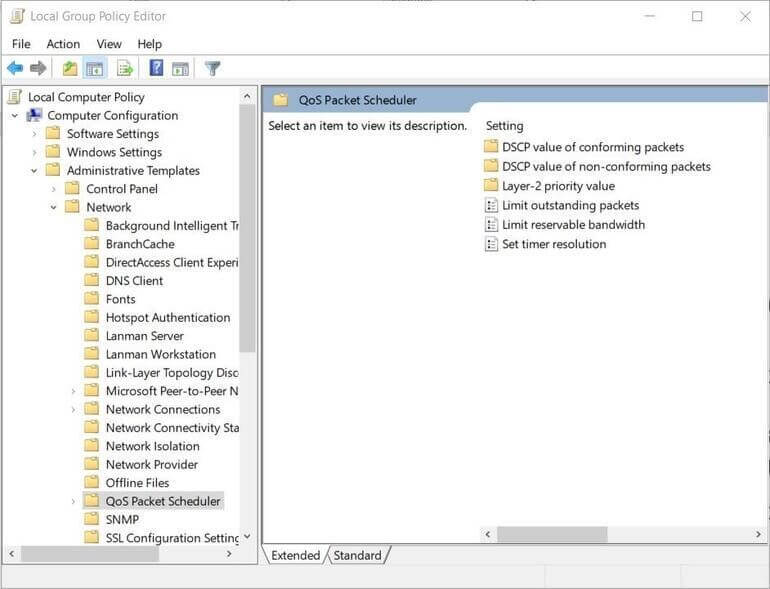
5. Now in the right pane, select Limit Reservable Bandwidth > double-click
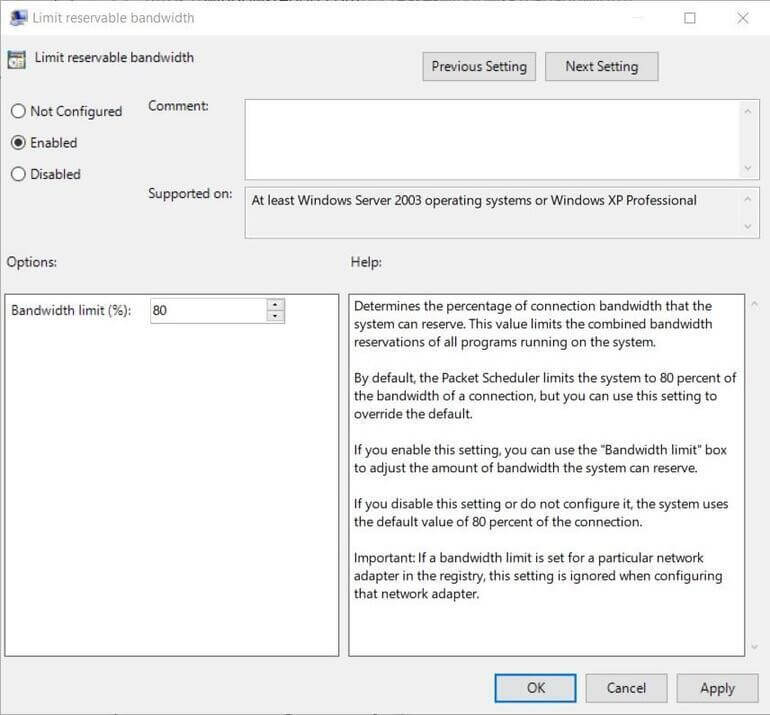
Select the Enable radio button and change the default value of 80 to zero.
Note: Selecting the Disabled radio button will not help as doing so will revert it to default.
6. Click Apply > Ok > exit editor
Now, if you try to download a large file, you should not face any problem and bandwidth should now be increased.
However, if you are a Windows 10 Home user, you will need to make some changes in the Windows Registry too. To learn how to do that, follow the steps below:
C. Modifying Reservable Bandwidth Settings Via Windows Registry
Alongside making changes to Group Policy Editor Windows 10 Home, users need to make some changes in Windows Registry too. To do so, follow the steps below:
1. Press Windows + R
2. Type regedit.msc > ok
3. Navigate to: Computer\HKEY_LOCAL_MACHINE\SOFTWARE\Policies\Microsoft\Windows\Psched
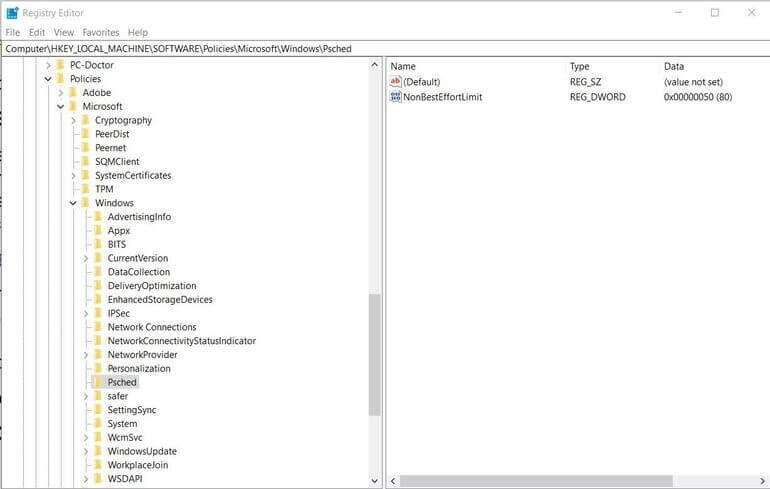
Note: If you cannot see the Psched Key, you will need to create one. For this, right-click anywhere in the left pane > from the context menu select New > Key > name it Psched. Now, select the Psched key > right-click > New > DWord (32-bit) Value > name it NonBestLimitEffort. Next, double click NonBestLimitEffort entry in the right pane and click the decimal radio button
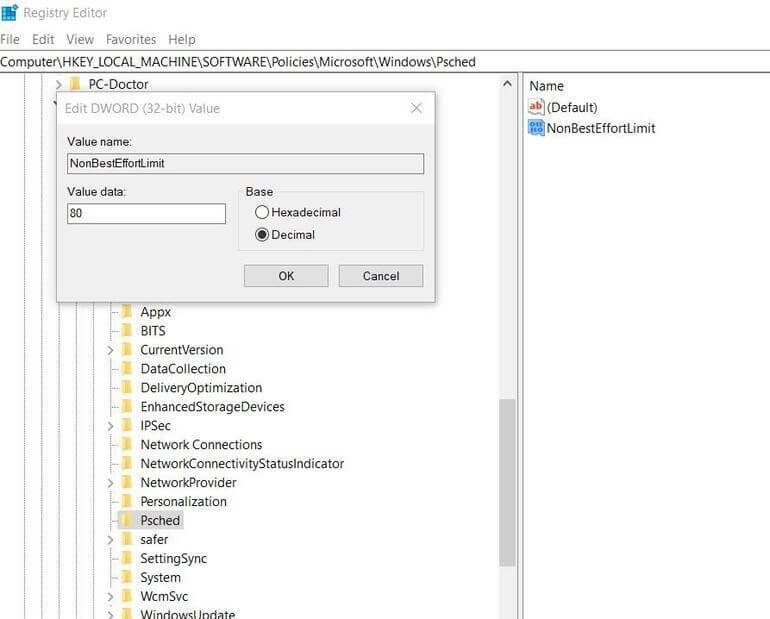
Change the reservable bandwidth percentage to zero.
Click Ok > exit Registry Editor
Doing so will remove reservable bandwidth restrictions.
1. Flush DNS and clear temporary files
2. Open an elevated command prompt
3. Type IPCONFIG/flushdns and press Enter.
4. Exit Command Prompt
5. Press Windows + R > type %temp% > Ok
6. Ctrl + A to select all the files and press Shift + delete
This will remove all temporary files and we hope using the steps explained above, you can increase bandwidth on Windows 10.
A piece of advice
This way, you can increase the bandwidth of both Ethernet and Wi-Fi but remember doing so will make your system vulnerable. Therefore, make these changes only when your productivity is being compromised. However, if reservable bandwidth doesn’t affect you, do not make the changes to default settings.
D. Close Background Applications –
You might not notice but a lot of applications run in the background on your devices. Some of these use the network connection and also cause a slow speed for running applications. If you wish to increase bandwidth on Windows 10, one of the methods to increase the download/ upload speed. Turning off the background applications will save the distribution of internet speed. To see which applications are running in the background, open Task Manager and close the running application by ending the task.
E. Disable Metered Connection –
If you are using a shared computer this can be one of the reasons for not getting a good speed. The metered connection is turned on to keep a cap on the data usage on Windows PC. By removing it you can get faster download and upload speeds. Follow the instructions to disable Metered connection on your computer –
- Open Settings and go to the Network & Internet option.
- Here click on the Change connection properties option shown on the right tab.
- Now scroll down to look for Metered connection, if it is turned on, toggle the switch to turn it off.
Now the restrictions on your Windows 10 PC due to the Metered connection will be removed and this will help you in increasing the upload and download speed.
Pro – Tip –
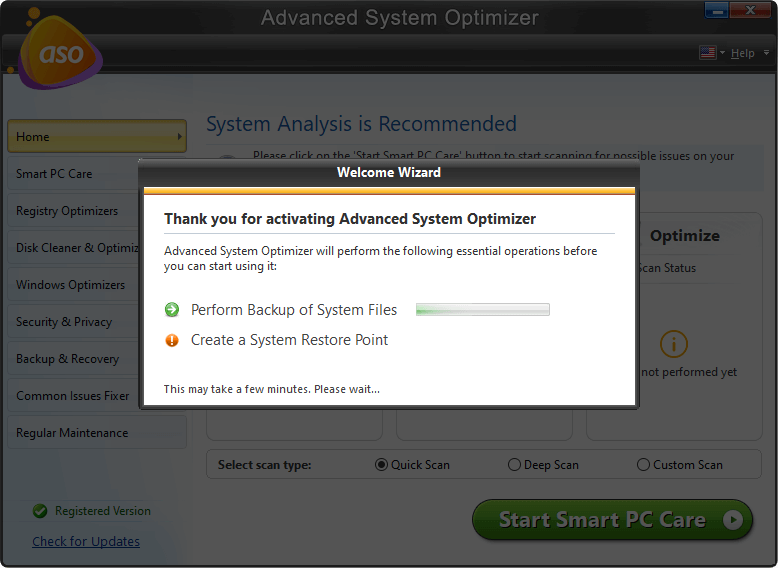
In addition to this to keep your system optimized and clean, we recommend using Advanced System Optimizer, the best PC cleanup tool. This professional tool helps clean junk files, fix invalid registry entries, update drivers, recover deleted files, defrag hard disks, and do a lot more.
Frequently Asked Questions –
Q1. What is the limit of reservable bandwidth?
As the name implies, Limit reservable bandwidth determines the percentage of connection bandwidth that is reserved by the system for Windows updates.
Q2. How do I turn off bandwidth limits in Windows 10?
To disable the bandwidth limit in Windows 10, follow the steps below:
1. In Windows search bar type Group policy editor
2. Navigate to Local Computer Policy choose Computer Configuration > Administrative Templates > Network > QOS Packet Scheduler > Limit Reservable Bandwidth
3. Change the percentage to 0
To learn how to do that in detail, you can read the detailed steps explained above.
Q3. Does Windows 10 limit download speed?
Windows 10 limits the download bandwidth only for background downloads. The Delivery Optimization for the updates takes it automatically on Windows 10. But for the manual updates on Windows or Microsoft Store the bandwidth set by the user does not apply.
Q4. What’s a good download speed?
A range of 25 to 100 Mbps is considered to be a good download speed for any Windows PC. An average download speed of 200 Mbps is required if you use rely heavily on downloading on your computer.
Q5. Should download and upload speed be the same?
Ideally, it should be the same for better usage but this is not the case with computers. As the service providers focus on downloading speed as that is what the internet is used for mostly. Therefore, you will see the variation in the download speed and upload speed a lot sometimes.
Conclusion –
There are many reasons why you would like to increase bandwidth on Windows 10. But the methods are limited and you can try them out to make sure which works best for you.
We hope this article will help you learn how to change the bandwidth limit on a PC. We would like to know your views on this post to make it more useful. Your suggestions and comments are welcome in the comment section below. Share the information with your friends and others by sharing the article on social media.
We love to hear from you!
For any queries or suggestions, please let us know in the comments section below. We would love to get back to you with a solution. We regularly post tips and tricks, along with answers to common issues related to technology.


 Subscribe Now & Never Miss The Latest Tech Updates!