I have a 4G and 5G network that I often use, Recently, after upgrading my Windows 11, I was only able to see the 4G network and 5G disappeared. I enquired from my service provider and some other users and they were able to use the 5G as well.
In this day and age, we can hardly imagine our life without the internet. And, for many of us who use laptops or desktops, Wi-Fi is the core medium of accessing the internet. But, what if one day out of the blue, you find out that your Wi-Fi network is not showing up on your Windows PC? This can be quite unnerving especially when your livelihood depends on the internet.
If that’s you, take a deep breath and try out the fixes mentioned below. We’d also like you to go through the probable causes so that you may be able to reason why the Wi-Fi network is not showing up.
Wi-Fi Network is not Showing up? Here’s how to fix
1.Restart Your Router
Don’t immediately rush to advanced measures. You can begin by restarting or power cycling your router in case your desired Wi-Fi network is not showing up on your Windows desktop. Even if this doesn’t work out, try the next few troubleshooting methods.
2.Check Hardware-Related Issues
Before heading on to the troubleshooting steps, recheck with other users in your locality if Wi-Fi is down. Or, if some damage has taken place in the line of your router. For this, you may even get in touch with the customer service department of your internet service company who will then send a technician to resolve the issue.
3.Disable The Airplane Mode

The “Airplane mode” disables all radio services that also include Wi-Fi as well. Here is a neat little trick that has worked out for users whose Wi-Fi didn’t show up initially. Click on the Wi-Fi icon and then click on the Airplane mode icon to enable it. Wait for a few seconds and then click on it again to disable it.
4.Set The Wireless Network Services To Automatic
It is quite likely, that if your Wi-Fi network is not showing up on your Windows 11/10 computer, the various wireless services are down. Before we look at how you can enable them, first, take note of the following services –
- DHCP Client
- Network Connected Devices Auto-Setup
- Network Connection Broker
- Network Connections
- Network Connectivity Assistant
- Network List Service
- Network Location Awareness
- Network Setup Service
- Network Store Interface Service
- WLAN AutoConfig
Now, follow the steps mentioned below and repeat them on each of these services –
- Open the Run dialog box, by pressing the Windows +R key combination.
- Type services.msc and press Enter.
- Locate and select the above-mentioned services one by one, right-click on them, and select Properties.
- When the Properties window opens, click on the dropdown next to Startup type and select Automatic
 .
.
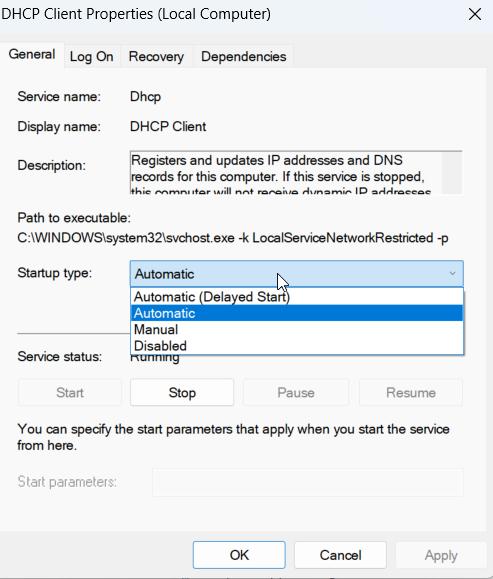 .
.- Repeat the same for all the services mentioned above.
- Restart your computer and now see if you are able to see your desired Wi-Fi network.
5.Use The Network Troubleshooter
In the case of Windows issues, sometimes you can entrust the inbuilt troubleshooter. For instance, if there is a puny issue with the Wi-Fi adapter, the network troubleshooter might just be able to fix it without any delay. Here are the steps to use the network troubleshooter –
- Press Windows + I to open Settings and make sure the System is selected.
- From the right-hand side, click on Troubleshoot.
- Now, here are two troubleshooters that you can run to fix the issue. Click on either of the troubleshooters, click on Run and follow the on-screen instructions that appear next.
- The Internet Connections troubleshooter, under the Most frequent
- The Network Adapter troubleshooter is under the Other

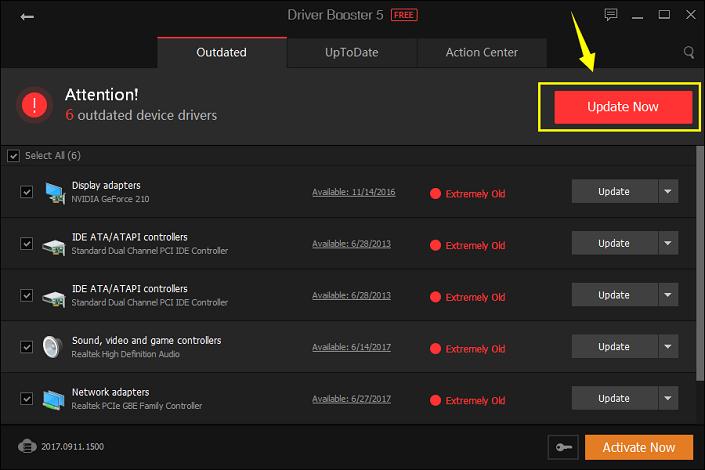
6.Update Network Driver
An outdated network driver is also one of the main reasons for connection issues such as the Wi-Fi network not showing on Windows 11/10.
You can either update drivers manually or employ a driver updater utility like IObit Driver Booster 10. Here are the steps to update your network driver using IObit Driver Booster –
- Download, run and install IObit Driver Booster.
- Click on the Scan button.

- Select your network driver from the given list of drivers by clicking on the checkbox next to it.
- Click on the Update Now
7.Reset Network Adapter
For a variety of internet-related issues, resetting the Network Adapter has proved to be quite effective. It helps reset all the previous data that was cached and refreshes it. Here are the steps to do the same –
- In the Windows search bar, type Control and click on open from the right-hand side.
- When the Control Panel window opens, select Category in the View by section.
- Click on Network and Internet.
- Click on Change adapter settings from the left-hand side.
- Select your Wi-Fi adapters from the list of adapters, right-click on it and click on Disable.
- Wait for a few minutes, right-click on your network adapter once again and click on Enable.
You should now be able to see your Wi-Fi network.
8.Set Network Adapter Channel Width To Auto
Still Windows Wi-Fi not showing up on your Windows 11/10 PC or laptop? You can try setting the network adapter channel width to Auto –
- Open the Run dialog box by pressing Windows + R.
- When the dialog box opens, type devmgmt.msc and press Enter.
- Locate your network adapter, right-click on it and click on the Advanced tab.

- Set the Value to Auto.
- Click on OK.
9.Flush DNS Cache or Reset TCP/ IP
If there is a problem with TCP/ IP, then you might not be able to see the Wi-Fi network. In such a case, you can try flushing the DNS. Here are the steps to do the same –
- In the Windows search bar, type cmd.
- From the right-hand side, click on Run as administrator.
- When the Command Prompt window opens, type the following commands by separating each of the commands with Enter –
netsh winsock reset
netsh int ip reset
ipconfig /release
ipconfig /flushdns
ipconfig /renew
Why Wi-Fi Network Is Not Showing up On My Windows 11/10 Computer?
- Internet service is down in your area
- There are some technical issues with your router
- Wi-Fi is incorrectly configured on your system
- Outdated Wi-Fi driver issue
- Device is out of the range of router
- Presence of virus
Wrapping Up
Is your internet connection back on track? Is your Wi-Fi network showing up on your Windows 11/10 PC? If yes, which of the above solutions helped you fix the issue? Do let us know in the comments section below. For more such useful information keep reading WeTheGeek. You can also find us on Facebook, Pinterest, Twitter, YouTube, Flipboard, and Instagram.

 Subscribe Now & Never Miss The Latest Tech Updates!