It’s a good habit to lock the screen when you are not working. So whenever not in use or whenever you feel you are going to be away from your screen for a while, pressing the Windows + L key won’t do you any harm. This would save your laptop or desktop from prying eyes.
But, what if the screen locks automatically and that too way too often? You might then need to look at ways to turn off auto-lock in Windows 10. This issue can quickly be resolved by making a few simple tweaks, such as disabling auto-lock in Windows 10.
You Might Also Want To Read: How to bypass Windows 10 lock?
If how to turn off auto-lock in Windows 10 is eating your brains, do read this blog from start to end and you shall have your problem resolved.
Ways To Turn Off Or Disable Auto-Lock in Windows 10
Let’s discuss some simple ways after which you would be able to lock your screen on your own will –
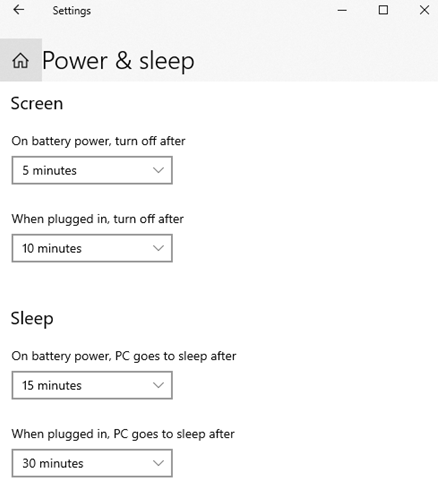
1.Turning Off Windows 10 Screen Lock Using Power & Sleep Settings

If your computer tends to lock after a specified period, these are the settings you are looking for.
- Go to Settings by pressing Windows + I keys
- Type Lock Screen in the search bar, the moment you will start typing you will get a Lock screen settings
3.When the Lock screen appears to scroll down till you can see the Screen timeout settings
- Find and click on Screen timeout settings
- You will now land on the Power & sleep window. Under Sleep, you can tweak the options
2. Using Control panel To Stop Windows 10 Screen From Locking Automatically

You can use the control panel and choose an apt power plan to prevent the screen from locking
automatically –
- Open the Control panel
- Click on Hardware and Sound
- Click Power Options
- You will see Change plan settings
- Now, click on Change advanced power settings
- When the Power Options opens locate the Sleep option and click on the ‘+’ sign
3. Using Windows Registries To Turn Off Windows 10 Auto-Lock

If you are curious about how to disable auto lock in Windows 10, here’s a neat trick. You can use the Registry Editor to enable the system unattended timeout. We’d recommend that you get a fair idea of how you can add, modify, and delete registry keys. Let’s get down to the steps now –
- Open the Registry Editor by pressing Windows + R key and then type regedit in the Run dialog box
- Click on Yes when you see the User Account Control prompt
- Once in the Registry Editor follow the below-mentioned path –
HKEY_LOCAL_MACHINE > SYSTEM > CurrentControlSet > Control > Power > PowerSettings > 238C9FA8-0AAD-41ED-83F4-97BE242C8F20 > 7bc4a2f9-d8fc-4469-b07b-33eb785aaca0
- Double click on Attributes and change the value from 1 to 2
4. Use The Group Policy Editor To Stop Windows 10 Screen From Locking Automatically

This trick is more suitable if you run the Windows 10 Pro version on your laptop or computer.
- Press Windows + R keys and type gpedit.msc to open the Local Group Policy Editor
- Once the Window opens click on the following path (click on each dropdown)
Computer Configuration > Administrative Templates > Control Panel > Personalization
- Double click on Do not display the lock screen
- Check the Enabled radio button
- Click on Apply and then OK
5. Using The Windows PowerShell (Admin) To Disable Auto-Lock Windows 10
Quite aptly named, the PowerShell in Windows 10 can do a host of wonderful things. It can completely wipe the hard drive, help you recover deleted files, zip/unzip files, and even remove bloatware. To add to this list, it can also help you turn off auto-lock in Windows 10 as well. Here’s how –
- In the search bar next to the Windows icon type Powershell
- Click on Run as administrator
- Click Yes on the prompt that appears
- When the Prompt opens type the following command and press enter
powercfg -attributes SUB_SLEEP 7bc4a2f9-d8fc-4469-b07b-33eb785aaca0 -ATTRIB_HIDE
In The End
Windows 10 auto-lock feature is great as it prevents your data from being snooped upon by prying eyes. It even conserves the power of your laptop or computer. Despite being a great feature, you might just want to turn off auto-lock in Windows 10 because it may hinder your work, especially if you are working for longer hours.
We earnestly hope that now you’ll be able to disable or turn off auto-lock in Windows 10. For more blogs on troubleshooting, keep reading WeTheGeek blogs and follow us on Facebook and YouTube.


 Subscribe Now & Never Miss The Latest Tech Updates!