BEFORE WE BEGIN:
Don’t just rush into factory resetting your MacBook, if it isn’t responding properly. Rather, you should try this!
Run Disk Clean Pro to declutter your system and get faster and smoother performance. Disk Clean Pro is an outstanding cleaning and optimization utility that will help you locate and eliminate useless residues, junk, caches, cookies, and duplicates to recover gigabytes of storage. To know more about Disk Clean Pro, you can try installing the product using the button below!
If you are all set to sell or give away your existing MacBook Pro or MacBook Air, you should consider wiping your machine and perform a factory reset. In this guide, we’ll list step by step instructions to backup entire data, sign-out from Apple Services, and reinstall macOS. We’ll also be sharing important tips that you should keep in mind to reset MacBook to original default factory settings.
Factory Reset MacBook Pro/MacBook Air
PART 1: What You Need To Do Before Factory Resetting Your MacBook Pro/MacBook Air?
There are certain recommended actions that you need to take before factory resetting your MacBook. These will ensure that you do not lose any important data when you switch to another macOS or Windows system.
1. Backup Your MacBook
We can’t certainly overstate the importance of backing up your entire data. If you don’t perform this step, all your data would disappear when you perform a factory reset.
To create a backup using Time Machine, follow the steps below:
- Connect an external storage device to your Mac.
- Click the Apple icon.
- Navigate to the System Preferences.
- Hit the Time Machine option.
- Click on the option – Select Backup Disk.
- Next, you need to select the External Storage Device and click the option Encrypt backups, followed by the Use Disk option.
- To wrap up, hit the ON button!
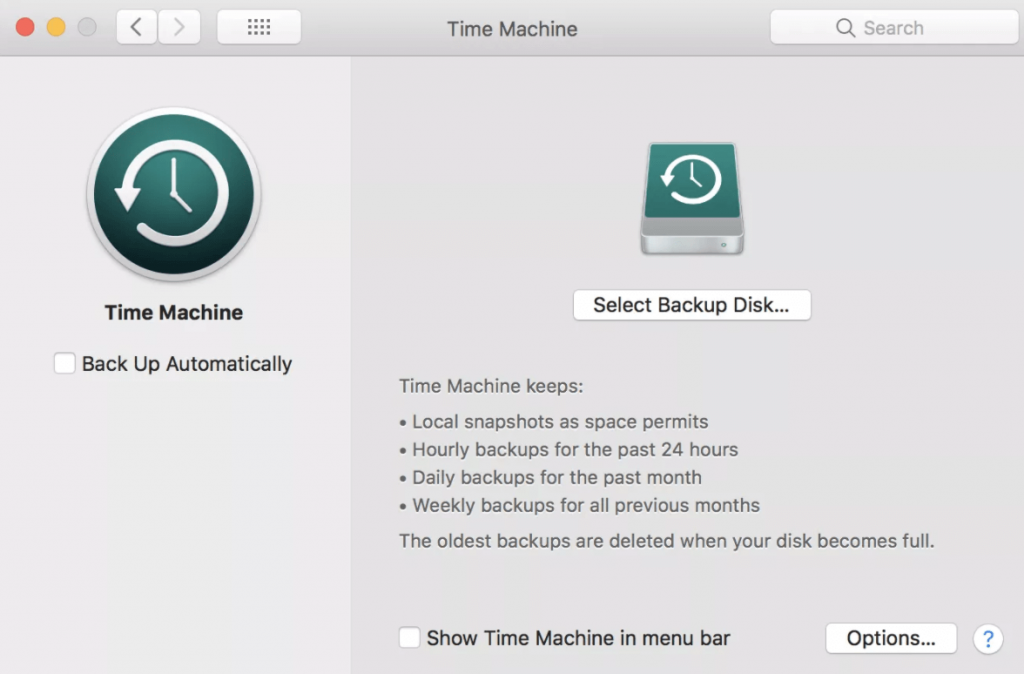
Time Machine will soon create a backup of your MacBook Pro or MacBook Air device.
 Additional Tip
Though Time Machine is an excellent way to backup and restore data on Mac. But, in case you don’t want to go through the manual hassles, we recommend using a reliable Cloud Storage & Backup Solution like Right Backup. It allows you to securely store all your important files and folders in an encrypted format that can only be accessed by you and no one else. To know more about Right Backup, you can check out the Review here!
Sign Up Now To Get 100 MB Of Free Storage Space!
Alternatively, you can check out the step-by-step guide to backup Mac using multiple methods!
2. Sign Out Of iTunes
De-authorizing yourself from Apple Services is small but a significant step you need to perform before you reset your MacBook Pro or MacBook Air.
Follow the instructions carefully to deauthorize your iTunes account:
- Launch the iTunes application.
- From the Menu, navigate to the Accounts section.
- Head towards the Authorizations section and click the option – Deauthorize The Computer.
- You need to enter your Apple ID and Password to complete the process.
- Finally, hit the option Deauthorize!
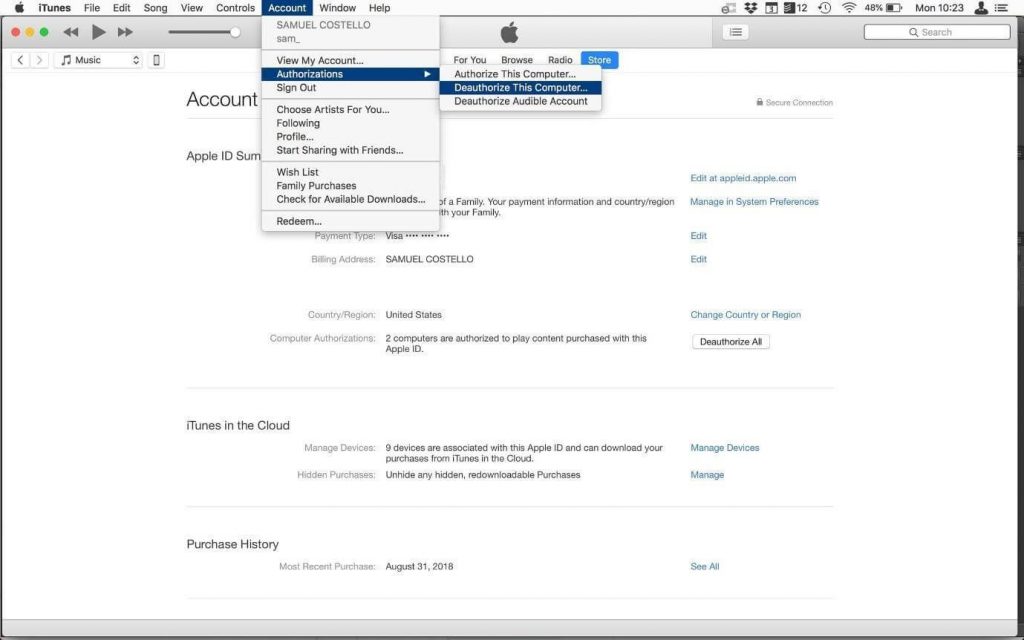
Now that you have successfully performed all the steps, it’s time to log out from your iCloud account!
3. Sign Out Of iCloud
We are so seamlessly dependent on iCloud that removing entire data chiefly means signing out. Make sure you have deauthorized your MacBook carefully.
Users running macOS Catalina & above can follow the steps to sign-out from an iCloud account:
- Hit the Apple icon from the top-left corner of the screen.
- Head towards System Preferences.
- You might need to enter your Apple ID.
- From the sidebar, navigate to the Overview section and simply Sign out.
In case you are running macOS Mojave or an earlier version, the process is much easier:
- Hit the Apple icon.
- Navigate to System Preferences.
- Choose the iCloud and hit the Sign Out button!
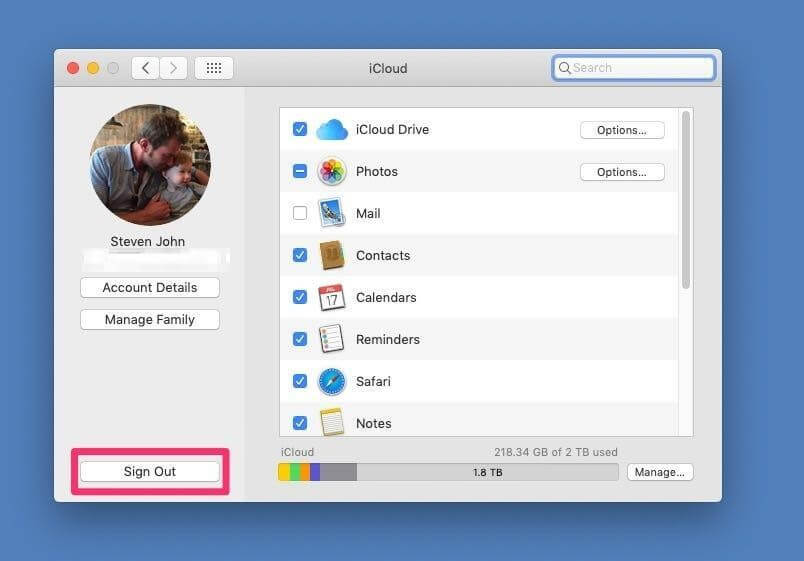
4. Sign Out Of iMessage
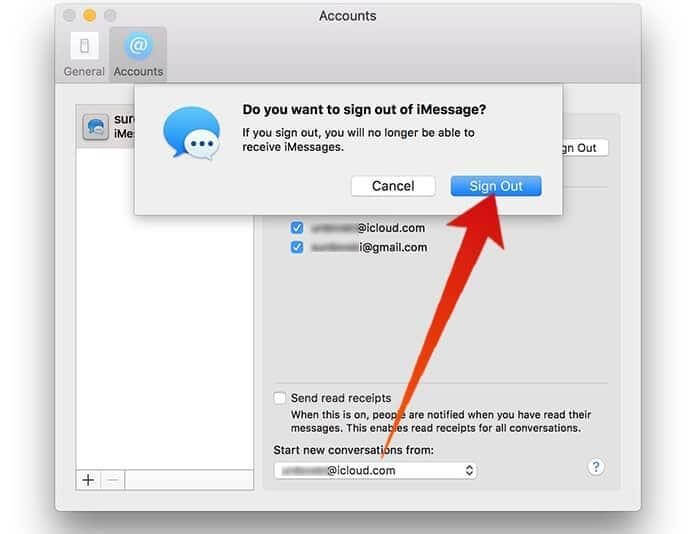
Since certain applications will require to be manually unlinked, sign-out of your iMessage service too. Follow the steps below to sign-out from iMessage:
Logging out of your iMessage is super-easy:
- Find and launch your Messages application
- You need to click the Messages by clicking on the Apple logo and further navigating to the Preferences option.
- Locate iMessage and hit the option Sign out!
For Beginners: How to Set-up an iCloud Account on your Mac?
5. Turn Off FileVault
FileVault helps users to encrypt the files from the hard drive. Now, since you are wiping all the files soon, security should not create a hurdle in your entire process of resetting MacBook Pro or MacBook Air.
To disable FileVault on MacBook, follow the steps below:
- Navigate to System Preferences.
- Head towards the Security & Privacy menu.
- Go to the FileVault tab.
- Make sure to check the option that says: FileVault is turned off for the disc (name of the main hard drive). If it is already switched off, you don’t need to do anything.
- If it is switched on, you have to click on the padlock icon.
- Enter your username and password to unlock successfully.
- At this point, you can Turn Off FileVault.
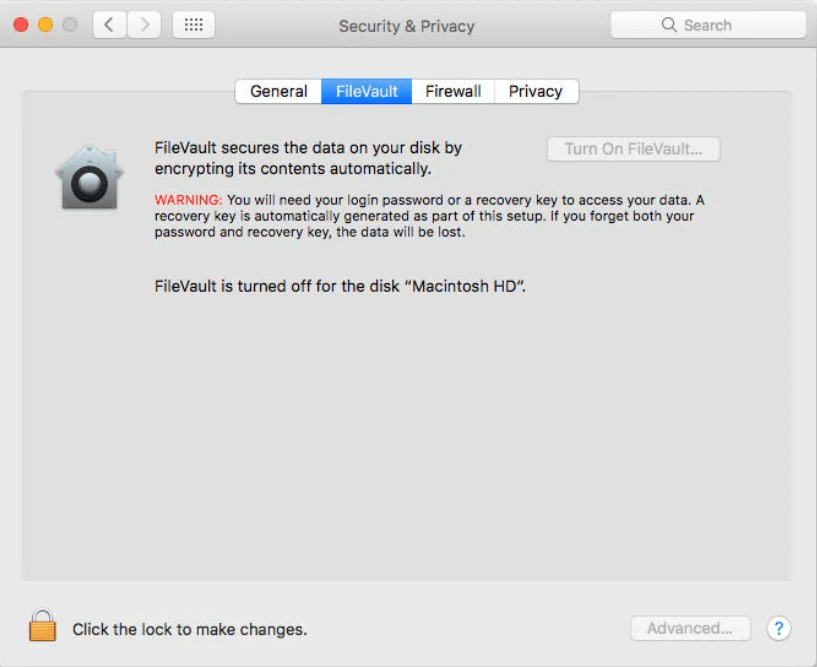
If required, you might have to enter the credentials again to let the decryption process take place!
6. Unpair Bluetooth Devices
If you are planning to sell or give away your Mac but thinking to keep your wireless mouse or keyboard, performing this step is crucial. If you don’t unlink the Bluetooth devices, you and the new owner can face inconvenience while using Bluetooth across different ranges of peripherals.
Perform the following steps to unlink the Bluetooth device:
- Hit the Apple icon > System Preferences.
- Head towards the Bluetooth tab.
- Go to the device you wish to unlink.
- Hit the ‘X’ button to complete the process!
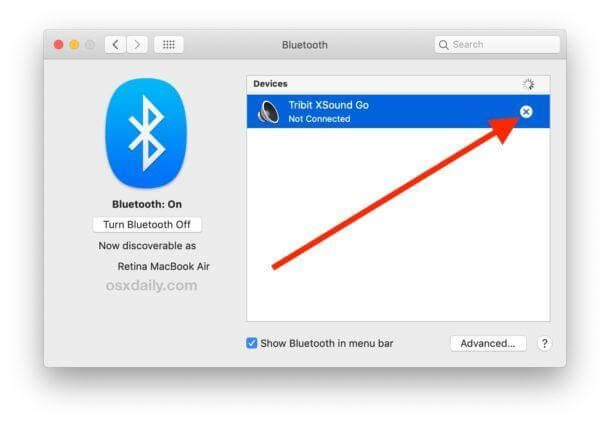
You might want to read: Mac Bluetooth Not Working – Here’s 5 Simple Hacks
7. Reset NVRAM
Last but not the least, resetting NVRAM will help you erase particular settings on your MacBook such as Time Zone, recent Kernel Panic Information, Configurations of startup-disk, display, volume, and so on.
- Hit the Apple icon.
- Select option Shut Down.
- You need to press and hold the keys: Option + Command + P & R altogether.
- Turn back ‘On’ your MacBook and instantly hit the keys: Option + Command + P & R altogether.
- Make sure you press and hold the keys for at least 20 seconds before you release them!

For more details, you can follow our complete guide: What, When, Why & How To Reset NVRAM On MacBook Pro?
PART 2: How To Reset A MacBook Pro Or MacBook Air?
Now that you have successfully fulfilled all the prerequisites for performing a factory reset on MacBook Pro or MacBook Air, follow the steps below:
- Boot up your Mac in Recovery Mode.
- You can press and hold Command + R keys altogether until you see the Apple logo.
- Once it appears, navigate to the Utilities window.
- Click on the option Disk Utility > press the Continue button.
- Now hit the View option, followed by Show All Devices.
- At this point, select your Hard Drive and click the option Erase.
- From the Format section, you can select the following options:
- If you are running macOS High Sierra or later: APFS
- If you are running macOS Sierra or earlier: Mac OS Extended (Journaled)
- Once you have selected the desired option, hit the Erase button!
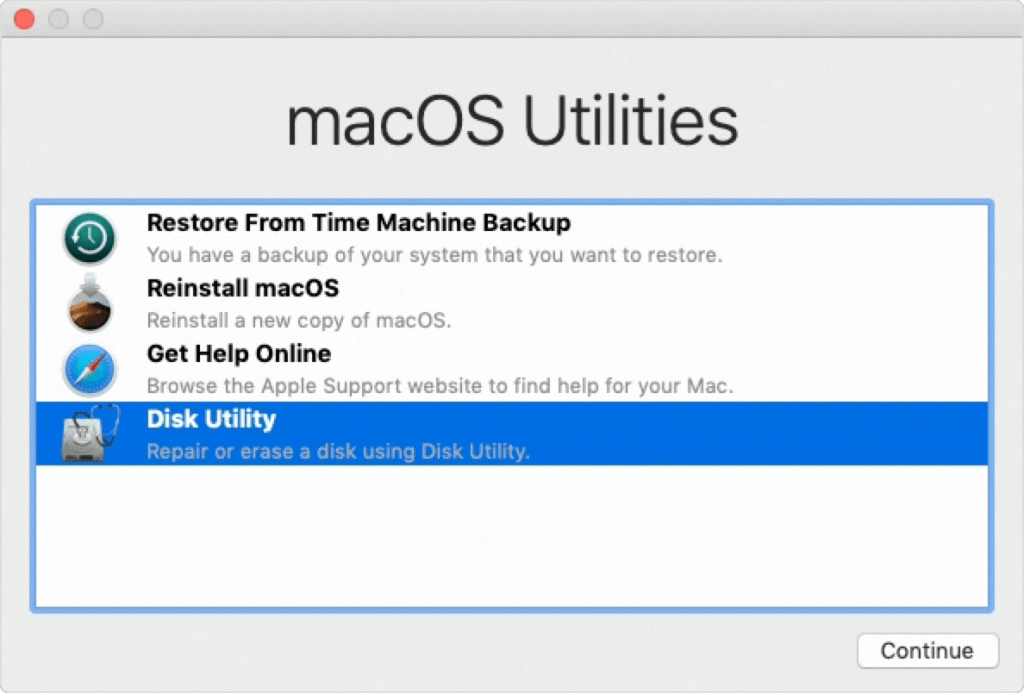
Keep patience as the process might take a few minutes to complete the entire factory resetting process. Once done, you can skip to PART 3.
PART 3: Finish Factory Resetting By Reinstalling macOS
To reinstall the macOS version, follow the instructions below:
- Get back to the macOS utilities window.
- Hit the Reinstall macOS button.
- Follow the on-screen instructions, you might need to select the disk to install macOS.
- Simply attach your Power cable (in case you are using a Mac Notebook).
- Click the option Install.
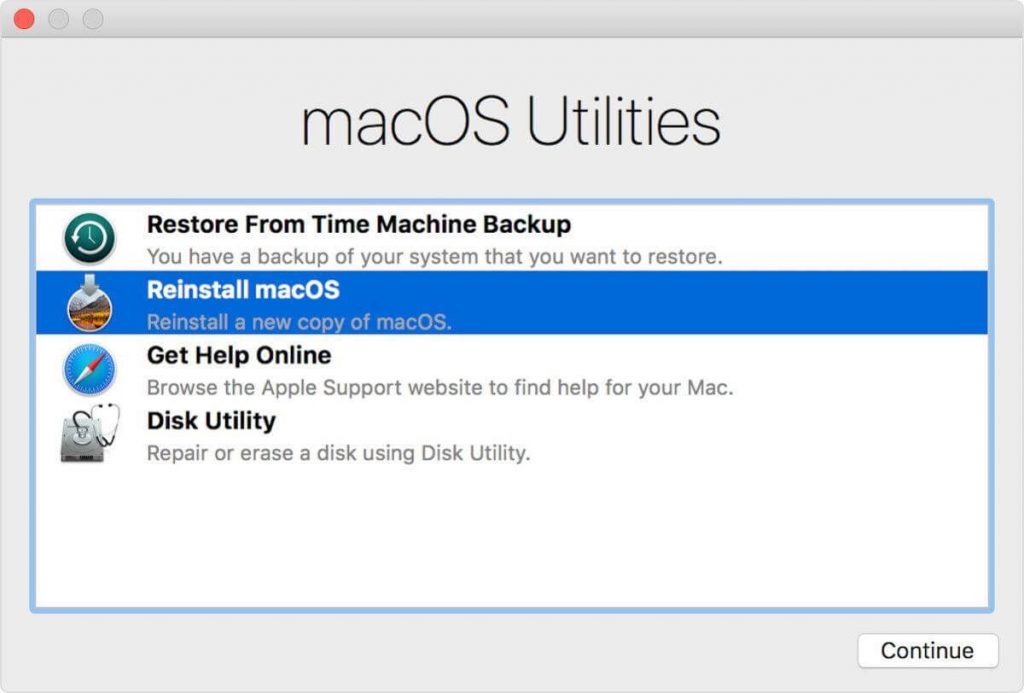
Depending on the SSD and HDD you are using, the installation process may take time.
PART 4: Read More WeTheGeek Tutorials: For Mac
If you are dealing with any other issues related to the Mac Operating System, you can follow the steps below:
 Facebook Facebook |
 Instagram Instagram |
 Twitter Twitter |

|


 Subscribe Now & Never Miss The Latest Tech Updates!
mariya jonsanm
These are the valuable steps and i also tried it and resolve my problem.Michael Stack
These steps are amazing – I really appreciate the guidance around things like signing out of iTunes (Music) to reduce the number of active authorizations. I always forget to do that.Mridula Nimawat
Glad it helped.