Gamers require heavy-end, dedicated graphics cards to support games’ graphics and gameplay, and therefore avoid breakdowns, halts, and crashes that may hamper their game. But, what about low-end desktops and laptops?
Well, these drivers may not power heavy games or 3D modeling, but support HD video output on-screen and the web. This is because they come with a pre-embedded Integrated GPU, which is built-in to the CPU. If you have ever asked yourself, “how to check my integrated graphics driver on my PC”, then read ahead and learn more about it.
What is an Integrated GPU?
As the name suggests, Integrated GPUs refer to that graphics card which is built into the system CPU or processor. These graphics access a portion of your memory per the type of task they have to perform on your system. These integrated GPUs are sufficient enough to support high-definition video streaming, play games of lower GPU requirements, and high-speed browsing over the web. These integrated graphics cards also support the basic display settings of your system and keep the screen colors intact.

The integrated GPU is installed by the processor’s manufacturer. Therefore, the integrated graphics card is of the same brand as the processor. So, if your PC is powered by any of the Intel processors, your system would have an Intel integrated GPU.
So here’s how to tell which Intel Graphics Card you have:
How To Identify Intel Graphics Card?
1. Using Device Manager
Step 1: Right-Click on Start Button and Click on Device Manager

Step 2: Find the option called Display Adapters, and click on the “expansion” button.

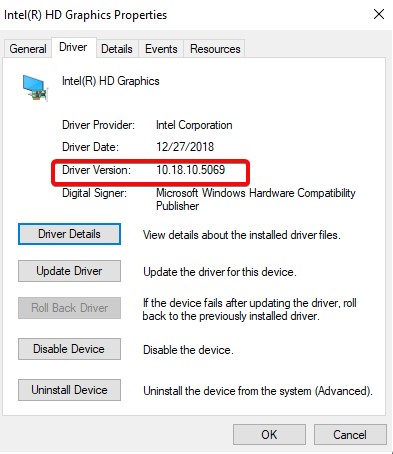
Step 3: Check the name to identify your Intel graphics controller. Here it is “Intel HD Graphics”. Right-click and select Properties.

Step 4: Here in Properties you can check the Intel HD Graphics Version. It’s highlighted in red in the image below.

2. Use System Information
Step 1: Press Win+R. Type command msinfo32 as Run command.

Step 2: On the left-hand side of the window, find “Components” and expand the window. From there, find Display.

Step 3: On the right-hand corner, you’d be able to spot which Intel Graphics Card you have and what version it has been updated to.

How to Update the Intel Graphics Driver Version
After you’ve checked Intel HD graphics card you have, you need to ensure that it is updated. In case your integrated graphics card driver isn’t updated, you’ll experience hangs, slowness, and possible crashes in your system. Your screen might pixelate, and you’d probably see your cursor movements moving slowly over the screen. Furthermore, HD videos may hang or may not stream properly. So, here’s how you can update your Intel Graphics card on your PC.
Option 1: Update through Device Manager
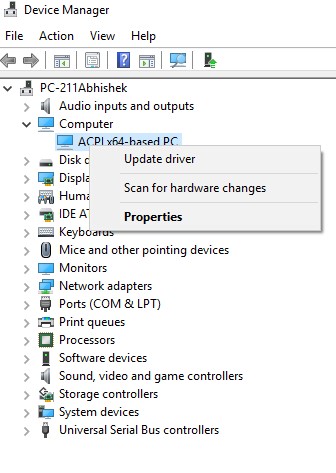
In the device manager, if you right-click on the driver’s name, you’d be able to find the option to update the driver.

After clicking on Update Driver, your system would use an internet connection to find available updates and would then update it on your command.
Option 2: Automate the Process
Instead of checking every now and then for any available update to your Intel Graphics Card driver version, you can automate the driver update process using a tool like Advanced Driver Updater. One of the best tools for a driver update, Advanced Driver Updater performs a scan on your PC to find available updates for any of the installed drivers. This includes the integrated graphics card driver as well.

Once the scan is performed, it would list out all the available updates on your system. Then, by clicking on the option “Update All”, you can update all the drivers on one single command. In case all the drivers are already updated, it would right-check all of them.
Using Advanced Driver Updater not only simplifies the driver update process but also free you of all the hassle of scanning manually for driver updates. There’s no point in wasting your time on crashing systems, so save it by checking for driver updates using Advanced Driver Updater automatically.


 Subscribe Now & Never Miss The Latest Tech Updates!