
External hard drive allows you to back up your important data, transfer it from one PC to another and protect it against substantial data loss. When you buy a USB Hard Drive, it comes formatted as a single partition by default. However, some users add new partitions to their drives so that they can organize files and folder more efficiently. Partitioning the hard drive helps divide space to individual segments so that each part can be dedicated to different purpose.
With the increase in multi-terabytes external drives, partitioning process helps in converting a single drive into a multi-drive functionality device with an abundance of space on each part.
So, if you’ve just bought a new USB Hard Drive or Memory Card and want to split it, follow this simple guide to ‘create multiple partitions in USB Drive’ and make the most out of your external hard device!

 How To Turn Off Fast Startup in Windows...Fast Startup or Fast Boot feature was initially introduced with Windows 8. While it is quite useful, they have been...
Here’s How To Partition USB Drive On Windows 10?
The newly bought USB Drive comes already partitioned & formatted to one big portion. In order to manage data in a better way, you can split the drive into two or more partitions. Learn how to create one:
Note: To make sure that you don’t lose any data during the partitioning process, do create a backup of all your files and folders.
METHOD 1- Partition USB Drive Via Disk Management Utility
The easiest & simplest way to split your hard drive is via using Windows’ built-in Disk Management tool.
Step 1- Connect the external hard drive you want to partition, with your system.
Step 2- To get into Disk Management utility, go to the Windows search box and type ‘Disk Management’ > click the first result ‘Create and format hard disk partitions’ and select the hard drive you wish to split.

You can also open Disk Management by going to Control Panel > Administrative Tools > Computer Management > Click on Disk Management under Storage head on the left-hand side. A list of all the existing and external drives will be presented on your screen.
Step 3- Go to the disk you want to create a partition on and right-click to find ‘Shrink Volume’ option.
Step 4- You’ll need to create some ‘Unallocated space’ before you can split the drive, so once the Shrink Volume box pops up > enter the amount of space you want to allocate > & hit ‘Shrink’ button.

Step 5- A new ‘unallocated’ space will be displayed next to all the existing drives. Right-click on it and select ‘New Simple Volume’ option.

Step 6- Go through the on-screen instructions and enter the size you want to allocate to your new partition.

Step 7- It’s a good practice to format the new & old drives when doing partition. So, when the format option is given, do so.

Step 8- Go on clicking ‘Next’ buttons, specify volume size you want to allocate to a new partition and ultimately hit ‘Finish’ to create the new partition.


That’s it a brand-new partition USB Drive is created!
 How to Manage Startup Programs in Windows 10Is your Windows 10 taking too long to start? Are you tired of waiting for your system to finally boot...
METHOD 2- Partition USB Drive Via Diskpart
If the above method doesn’t work for you well, you can try creating multiple partitions via Command Prompt, Diskpart is a disk partition utility that works using the command line.
Step 1- Go to the Windows search bar > type ‘cmd’ > open Command Prompt > type ‘Diskpart’ > hit Enter

Step 2- At the disk prompt, execute the following commands to create partition in USB Drive.
list disk
select disk ‘n’ (n – enter the disk value from the list)

create partition primary size = 8000 (enter the value of allocation)
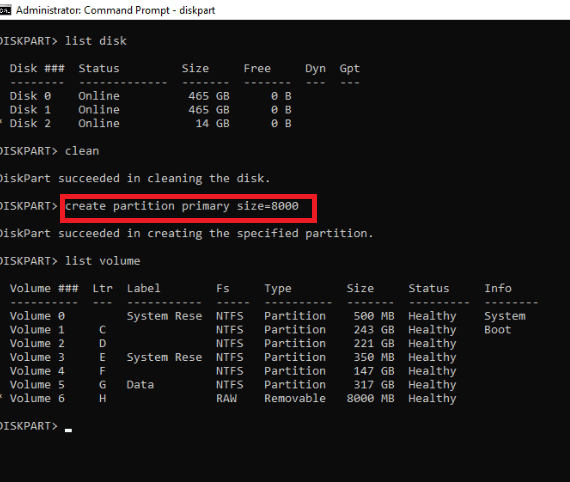
assign letter = ‘n’ (n- give the partition a name)
Step 3- It’s a good practice to format the new & old drives when doing partition. So, execute one more command. “format fs-fat32 label – ‘n’ quick”. (n- partition name)
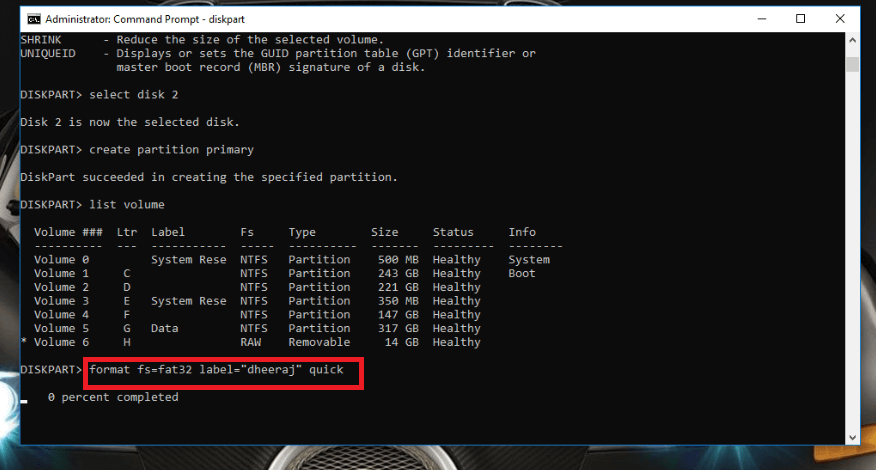
That’s all! You’ve successfully formatted the external hard drive which has new partitions.

These are the best methods to create multiple partitions in USB drive, choose which one is simpler and more straightforward. Start organizing your files and folders more efficiently!

 Subscribe Now & Never Miss The Latest Tech Updates!