If you have purchased a HyperX Cloud Alpha headset with a mic to enhance your gaming experience, then probably it is one of the wisest decisions that you have made. This device portrays the best sound quality without lag while speaking through the mic. However, if you are facing issues with the microphone as if your friends are not able to hear you at all or with delay, then this guide will help you resolve the HyperX Cloud Alpha microphone not Working on Windows 10.
Different Methods To Fix HyperX Cloud Alpha Microphone Not Working On Windows 10
There are a few troubleshooting methods recommended on gaming forums by experts that can help you to fix the HyperX Cloud Alpha mic not Working on Windows 10. You do not have to try all the methods and make sure to check if the issue has been resolved after trying each step. This way you can discard the remaining steps after the issue HyperX Cloud Alpha Mic has been fixed.
Assuming that all the connections are properly plugged in and the volume settings are turned on to maximum, let us start with the troubleshooting process.
Method 1: Troubleshoot Mic
Microsoft has inculcated a series of troubleshooters that help fix issues automatically by following the on-screen instructions. Here are the steps to run the Mic troubleshooter on Windows 10:
Step 1: Make a right-click on the Speaker icon in the bottom right of the taskbar and then choose Open Sound Settings from the context menu.
Step 2: The Sound settings window will open where you have chosen HyperX Cloud Alpha Mic under Choose Your Input Device and then click on the Troubleshoot.
Step 3: Click on Next and Windows will automatically troubleshoot the Cloud Alpha microphone issue on your system.
Method 2: Allow Access To Microphone
To ensure security and privacy on your Windows 10 PC, Microsoft has enabled certain policies that require external devices to acquire appropriate permission before being able to function optimally. Having said so, the next troubleshooting step involves granting the apps installed access to the Cloud Alpha microphone. Here are the steps to accomplish that:
Step 1: Type ‘Microphone’ on the search box located in the left bottom corner of the taskbar.
Step 2: From the results displayed, click on Microphone Privacy Settings.
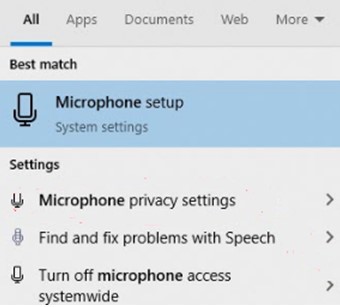
Step 3: When the new settings window opens, switch the toggle button labeled as Allow Apps To Access Your Microphone, towards the right and it will turn on.
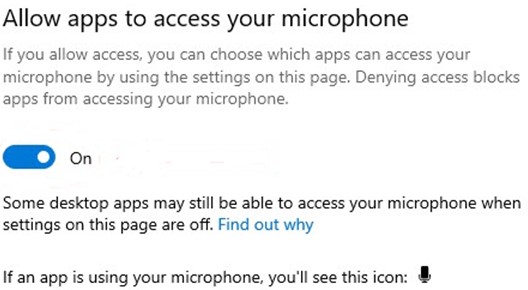
Step 4: Finally, scroll down and choose the apps that should be allowed to use the Hyper X Cloud Alpha mic. Turn on the toggle switch individually for each app.

Step 5: Check if the issue of Hyper X Cloud Alpha mic not working on Windows 10 has been resolved.
Method 3: Alter Mic Settings
Now that your Hyper X Cloud Alpha mic has been allowed access, and you have run the Microsoft troubleshooter too but without getting a resolution. It is time to alter the current Mic settings and fix the Hyper X Cloud Alpha mic not working in Windows 10. Here are the steps to achieve this:
Step 1: Just as in the previous method, make a right-click on the Speaker icon in the taskbar near the date and click on Sounds this time from the context menu.
![]()
Step 2: A small Sounds dialog box will open where you have to choose the Recordings tab. This will display all the audio-related devices connected to your system and you have to click on Hyper X Cloud Alpha mic and then click on Set Default at the bottom right of the window.
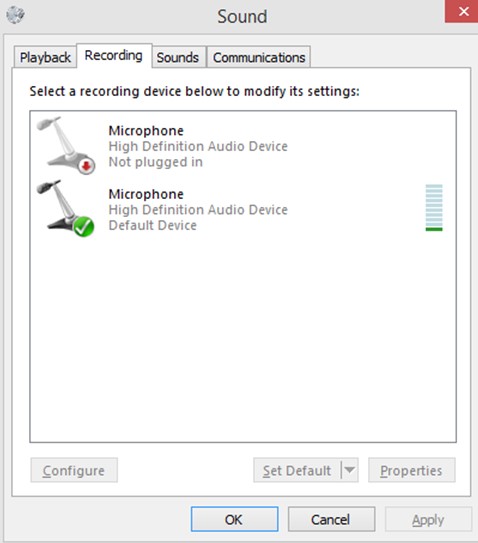
Note: Make sure that when the Cloud Alpha microphone is set as default, it displays the correct name with high signal strength.
Step 3: Make a right-click on Hyper X Cloud Alpha mic and then choose Properties. Now, click on the Levels tab and ensure that the volume slider is 100%.

Step 4: Close all windows by clicking on Apply followed by OK to ensure all the changes you have made will take effect.
Note: Do not click on X at the upper right corner to close the window without clicking on Apply and OK.
This will help to resolve Hyper X Cloud Alpha mic not working in Windows 10
Method 4: Update Audio Drivers
The final troubleshooting recommended by many gaming experts is to update the drivers of your system especially the Audio driver. Drivers are small programs developed to establish communication between the hardware and software. Hence, it is very important to keep your drivers updated to ensure smooth and flawless functioning of your PC. There are two ways to update your drivers:
Option 1: Update Drivers Manually
To update drivers manually, you must identify the make and model number of your sound card and then visit the device manufacturer’s official website. Next, search for your device drivers on the website and download them. The process concludes with either extracting the file or executing it and installing the driver on your system. The two most common sound cards used are:
You can click on them if your sound card is one of them to open the official support website on your default browser.
Option 2: Automatic Update
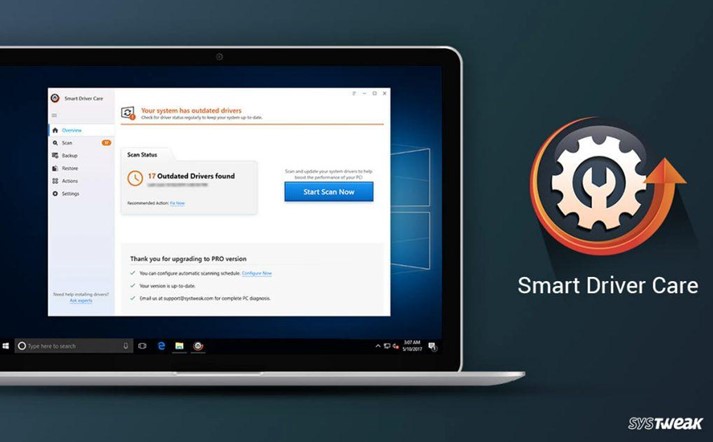
The second option which is rather very convenient and saves time and effort is to update your drivers automatically using Smart Driver Care. This application scans your computer’s hardware and the existing drivers and then searches for the most compatible drivers available on the internet. It also identifies any missing and corrupt drivers and replaces them as well. Here are the steps to use Smart Driver Care on your PC:
Step 1: Click the button below to initiate a download of the Smart Driver Care app,
Step 2: Once the download is complete, install the app and launch it open.
Step 3: To begin the scan of driver issues, click on the Start Scan Now button.
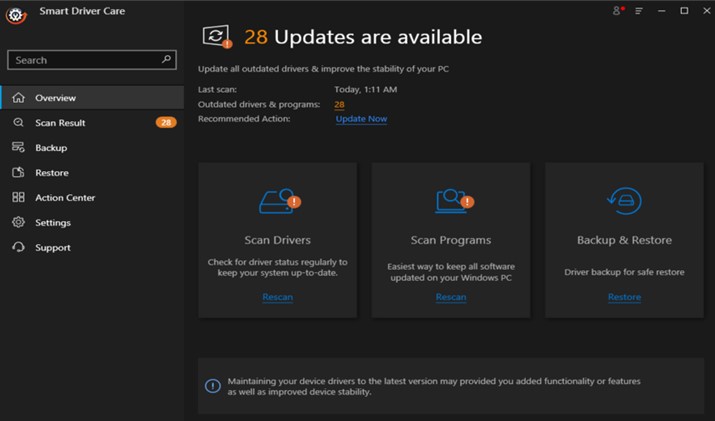
Step 4: A list of driver issues will be displayed on your screen.
Step 5: Locate your Sound Card among the list of driver issues and then click on the Update driver link beside it.
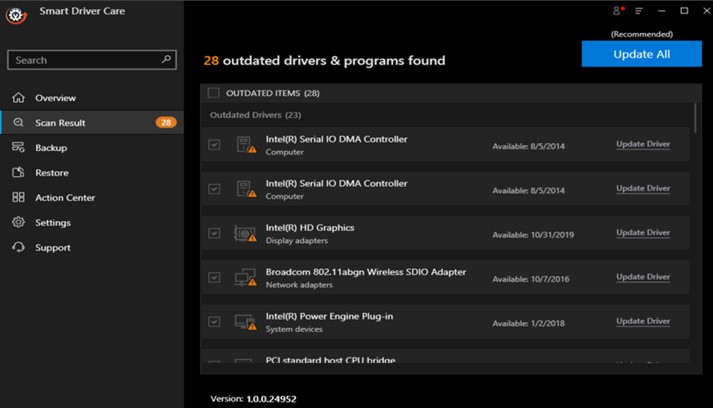
Once your sound driver is updated, restart your computer and check if the Hyper X Cloud Alpha mic not working in Windows 10 has been resolved.
The Final Word On HyperX Cloud Alpha Microphone Not Working In Windows 10
These troubleshooting steps are sufficient to resolve any mic and sound issues in your PC. If the issue is not resolved then try the HyperX Cloud Alpha Microphone on another device to determine if it is a hardware issue. Updating drivers is a trustworthy method and seemed to have resolved many such similar issues. Use Smart Driver Care to ease the driver updating process and save time and effort.
Follow us on social media – Facebook, Twitter, and YouTube. For any queries or suggestions, please let us know in the comments section below. We would love to get back to you with a solution. We regularly post tips and tricks, along with answers to common issues related to technology.
![[Fixed]HyperX Cloud Alpha Microphone Not Working On Windows 10](https://test.wethegeek.com/wp-content/uploads/2021/01/FixedHyperX-Cloud-Alpha-Microphone-Not-Working-On-Windows-10-1200x750.jpg)


 Subscribe Now & Never Miss The Latest Tech Updates!