Is your brand-new Windows 10 computer lagging? Well you are not the only one! Recently, many users reported that their Windows 10 disk utilization reaches to 100%, leading to lagging and unresponsive system.
So, in this tutorial, we are providing 5 tips to fix the issue of 100 percent disk usage problem in Windows 10.
How To Fix 100% Disk Usage On Windows 10
1. Disable Windows Search
To fix, 100% disk usage in Windows 10, firstly, you must disable Windows search temporarily and check if the computer speeds up. In case the problem still not resolved then move to disable Windows search permanently.
- Disable Windows Search (Temporarily)
Windows search allows you to search files on your computer faster. However, if you do not use it, you can disable it. Once you will disable the service it will stop the indexing of all files.
However, when you reboot your computer the Windows search will start again.
- Press Windows logo key and X in a combination and select Command Prompt (Admin).

- Click Yes at the User Account Control window prompt.

- In the Command Prompt window, type “net.exe stop “Windows search”” and press Enter.

Check if disk usage of your computer improved. If this step worked, then you must disable Windows Search permanently as shown below.
- Disable Windows Search(Permanently)
- Press Windows logo key and R in a combination, a box will open->type “services.msc” and press Enter.
- Scroll down and find “Windows Search” and right-click on it and click on Properties.

- Change the Startup type to Disabled. Then click Apply and OK to save your change.

2. Disable SuperFetch Service
In Windows 10, it has been identified that SuperFetch service is causing a disk performance issue. Disabling SuperFetch decreases boot time and speeds up the computer. Here’s how to stop SuperFetch service:
- Press Windows logo key and X in a combination and select Command Prompt (Admin) and allow its user account control.
- In the Command Prompt window, type “net.exe stop superfetch” and hit Enter.

Wait for few moments to check if your computers performance better.
3. Reset Virtual Memory
Virtual memory is a memory which is used as an extension of your computer’s physical memory. When RAM is not having an enough memory to perform a task then Windows temporarily stores files in virtual memory to complete the task and switch back to RAM again. Unnecessary, virtual memory allocation may lead to high disk usage.
You can reset virtual memory using the steps below:
1) Press Windows logo key and Pause/ Break key in a combination. Then select Advanced System Settings on the left panel.

2) Tap Advanced tab, then click Settings.

3) Now, tap Advanced tab again, and select Change… under Virtual memory.

4) Make sure the Automatically manage paging file size for all drives checkbox is unchecked.

5) Select your Windows drive, the hard drive or partition that has Windows installed on it. In our case it is C:, now enter an Initial size and Maximum size for your virtual memory:
- Initial size – This value can vary and it depends on your computer. If you’re not sure what value to enter, just enter from the Recommended category.
- Maximum size – use the size 1.5 times the size of your physical RAM. e.g. If your computer has 4 GB (4096 MB) of RAM then you should have to enter 6,144 MB virtual memory not more than that.
- Once you’ve entered values, click Set, then click OK to continue.
6) Now, clear all your ‘temp’ files on your PC. To do so, press Windows logo key and R in a combination, a Run box will open, type temp and press Enter. This will open Windows Explorer with all the temp files on your PC.

7) Select all the files in the Temp folder and delete them.
Wait for few moments to check if your 100% disk usage is fixed.
4. Fix your StorAHCI.sys driver
If you have tried all above solutions and the problem is still not resolved, then you can try this. It has been found that 100% disk usage issue might be caused by some Advanced Host Controller Interface PCI-Express (AHCI PCIe) models running with the inbox StorAHCI.sys driver due to a firmware bug.
Here’s how to check and how you can fix it:
Check if you are running the inbox AHCI driver (StorAHCI.sys)
- Press Windows logo key and R in a combination, a Run box will open, type “devmgmt.msc” and press Enter.
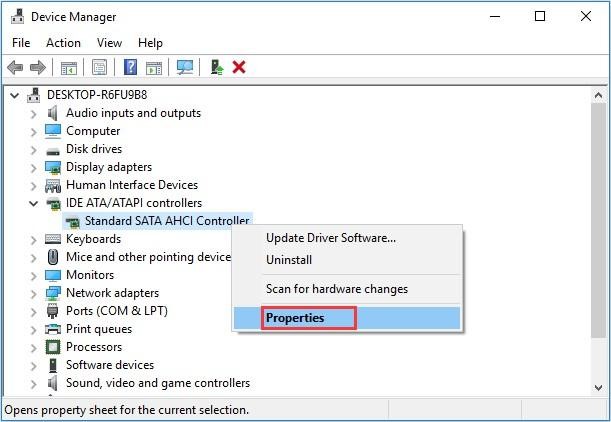
- Under IDE ATA/ATAPI Controllers, right-click Standard SATA AHCI Controller and choose Properties.

- Now, tap on Driver tab and click Driver Details. If you see storahci.sys in the list i.e. you are running the driver.

Now Disable MSI for the controller in the registry
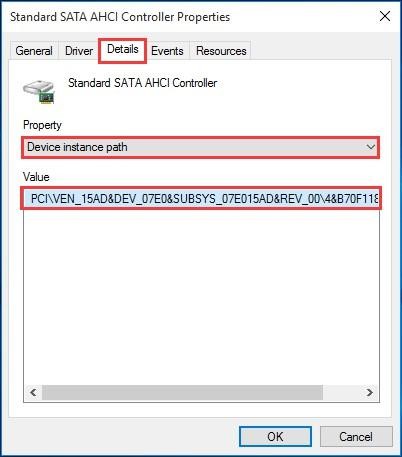
- Close the driver files details window, now go to the Details tab and select “Device instance path from the drop-down menu. Note down the path starts from PCI\VEN.

- Now, press Windows logo key and R in a combination, a Run box will open, type regedit and press Enter.
- Follow the following path to HKEY_LOCAL_MACHINE\System\CurrentControlSet\Enum\PCI\<AHCIController>\Device Parameters\Interrupt Management\MessageSignaledInterruptProperties, where <AHCI Controller> refers to the device instance path you noted in the above step. Then change its value of the MSISupported key from 1 to 0.

Re-start your computer and check whether this step has been worked to fix the issue.
5. Use Disk SpeedUp Tool
If the all above solutions did not help, it is mandatory having a check of your hard drive. You can do this by using Disk Speedup developed by Systweak. It is used to defragment the hard drive. Download Here.
It securely defrags the hard disk, restoring hard disk storage efficiency and giving a major performance boost. It scans through the whole system to find the data and files which lie haphazardly fragmented on the hard disk, and brings them together to reduce the data access time.

This should be done periodically to maintain consistency and stability in system’s performance.
That’s all folks!Hope that you have fixed 100 percent disk usage issue in Windows 10. If you have any question or suggestions, please feel free to share them in the comments section below.


 Subscribe Now & Never Miss The Latest Tech Updates!
Ashly Peterson
Very good I like the way wrote the 100% disk usage problem.This is so great I think others could benefit from learning about it. Keep it up guys!!Christian Wolf
Well , that was very helpful . Thanks very much .