
One of the most frustrating problems faced with computers is the sudden malfunctioning of your keyboard which paralyzes your work as you cannot do much with a faulty keyboard. I bet most of you knew that Windows 10 provided an onscreen keyboard, but did you know how to activate it and use it efficiently? Here are a few tips and tricks that can make your Windows 10 on-screen keyboard more convenient and fun.
How To Enable The On-Screen Keyboard On Windows 10?


It is very easy to enable an on-screen keyboard on your Windows 10 computer. There is a keyboard shortcut to do so, Windows Key + CTRL + O. However, someone would only use the Windows on-screen keyboard when the physical keyboard is not working. If that is the case, then this shortcut would be useless. But what if you are accessing your email or Internet Banking on a public computer? It is recommended to use an on-screen keyboard as it would be more secure in cases a key logger application is installed on that computer, preventing these apps to record every key struck on the keyboard.
To activate the Windows on-screen keyboard:
Step 1. Open Windows Settings by pressing the Windows key and the letter I together.
Step 2. Choose Ease of Access from the Settings window.

Step 3. Choose Keyboard from the left-hand menu, and click on it once.
Step 4. On the Keyboard settings page, slide the toggle button under the first option that is labeled as Use the On-Screen Keyboard.
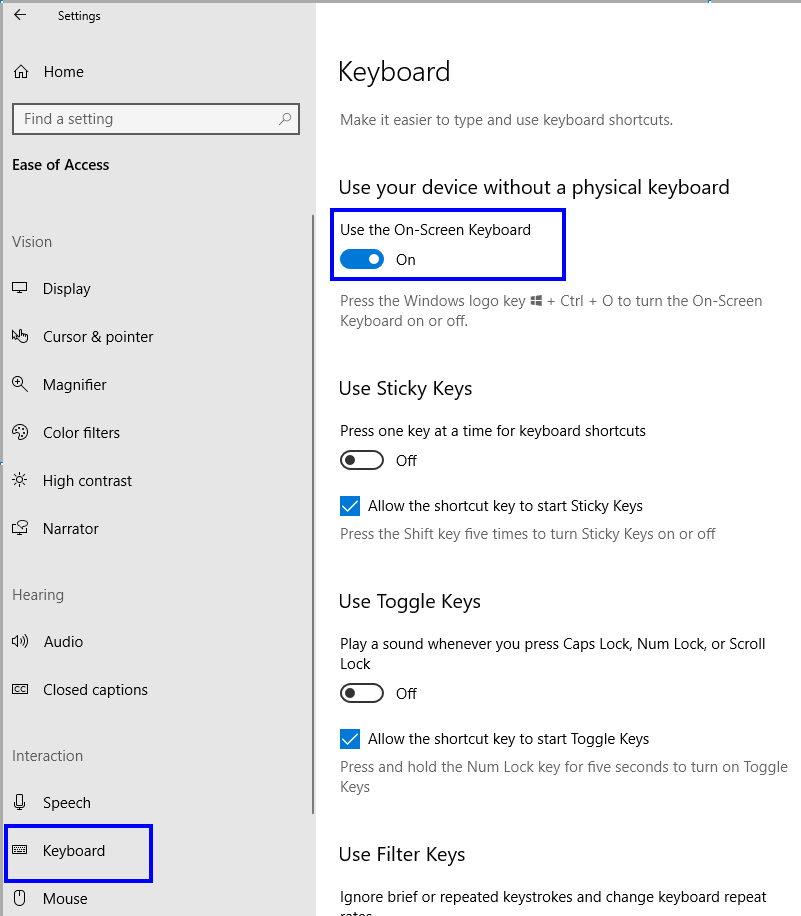
Step 5. The on-screen keyboard will be enabled and will display on the screen.
Step 6. If you are a frequent user of Windows on-screen keyboard, then I suggest you make a right-click on the icon of the on-screen keyboard from the taskbar, and select Pin to Taskbar. This will create a permanent shortcut on the taskbar which can bring on the on-screen keyboard in Windows 10 with just a mouse click.

How to Customize the on-screen keyboard Windows 10?
Now that you know how to activate the Windows on-screen keyboard and set a shortcut on the taskbar, here are a few steps to customize it as well:
Customization 1. Size and Shape.
The on-screen keyboard is rectangular in shape and as such it has four corners. Place your mouse cursor on any one of the four corners and you will notice that the cursor changes from the tilted arrow to double-pointed arrow. Now, press and hold the left click of your mouse and drag the cursor. You will see that this will increase or decrease the size of the keyboard, depending on which direction you choose to move.

Customization 2. Key Sound
If you want to get the same feeling of using a physical keyboard, then you can always enable the sound effects on Windows on-screen keyboard. To do so, follow these steps:
Step 1. Click on the Options button on the on-screen keyboard in Windows 10. This button is in the bottom right section, below the PrtScn button.
Step 2. To enable the sound, place a checkmark next to the first option that is labeled as Use Click Sound.

Customization 3. Controlling the Key Input
If you want to customize on how to select a key on the virtual keyboard, you can click or hover over it, then click on Options again to choose the relevant option.
Customization 4. Text Prediction
Microsoft has designed its own text prediction application which is inculcated with Windows 10 On-Screen Keyboard and you can enable it by clicking the Options button on the keyboard.
Customization 5. Right-Click.

If you want to make a right-click through the on-screen keyboard, then you can easily do it by clicking a button. This button has no label but a box icon on it, and it allows you to display the right-click menu attached to any application.
Customization 6. Fade
The default size of the on-screen keyboard is rather too large and covers almost half of the screen. You can, of course, resize it by following the steps mentioned above or you can Fade it as well to view the screen behind the keyboard. Just press the Fade button which is the last button on the right bottom corner of the Windows on-screen Keyboard and the Keyboard will fade away until you click again anywhere on the keyboard.
Customization 7. Dock
The Dock Option on the keyboard aligns the on-screen keyboard toward the bottom of your computer screen. It enlarges itself to fill the screen horizontally and locks itself. It becomes convenient to use the keyboard just as a physical one.
Conclusion
The use of an on-screen keyboard is needed in case your physical keyboard breaks down or malfunctions and also if you are accessing personal information over a public network. There are many third-party software that offers an onscreen keyboard, but by far Windows 10 In-built Keyboard seems to be the best.

 Subscribe Now & Never Miss The Latest Tech Updates!