
File Transfer Protocol server on Windows 10 enables a user to download and upload files from anywhere virtually to your PC. When you use File Transfer Protocol server also called FTP, you are developing a private cloud for which you have supreme control. Moreover, the speed depends on your internet subscription and there is no monthly transfer cap. It has other benefits such as no file size or type limitations or restrictions. So, no matter whether backup file is as small as 1KB or as big as 1 TB. There is no limitation to the number of accounts created so you, your friends, colleagues and family can store their files and share them. Windows 10 provides you with an option to create FTP server on Windows 10.
In this post, we have listed the steps to setup an FTP server on PC so that you can transfer your files within private network or remotely over the internet.
1. Install the FTP server components on Windows 10
Windows 10 enables you to setup an FTP server however you have to add components needed on your own.
For installation of FTP server components, follow these steps:
- Go to search bar and type Control Panel and press enter.

- Now navigate to programs, then Programs and Features. Locate and click on “Windows features on or off”


- Now click to expand Internet Information Services option and then FTP server.

- Put a checkmark beside FTP Extensibility and FTP Service options.

- Now put a checkmark beside “Web Management Tools” and expand it to check whether “IIS Management Console” is checkmarked.

- Click OK and then Close button.
After completing these steps, you will get all the components that you need to setup FTP server on your computer.
Configure an FTP server site on Windows 10
To configure FTP server on Windows 10, you need to create FTP site, allow external connections and setup firewall rules.
 10 Best Proxy Servers For Windows In 2023If any website which you want to access is blocked or not available for your region or IP address, then...
First Step 1: Set Up an FTP site:
- Go to search bar and type Control Panel and press Enter.

- Click on System & Security.

- Now click Administrative tools.

- Navigate to Internet Information Services (IIS) Manager and double click on it.

- Under “Connections”, locate Sites and right click on it.

- Click “Add FTP site”

- Now in FTP site name, type a name of the server.

- Go to Physical Path -> Content Directory, locate the button on the right hand side to select the folder where you will store FTP files.
- Click Next button.
- Use default binding settings.
- Put a checkmark beside “Start FTP site automatically”
- Under SSL, put a checkmark beside “No SSL”
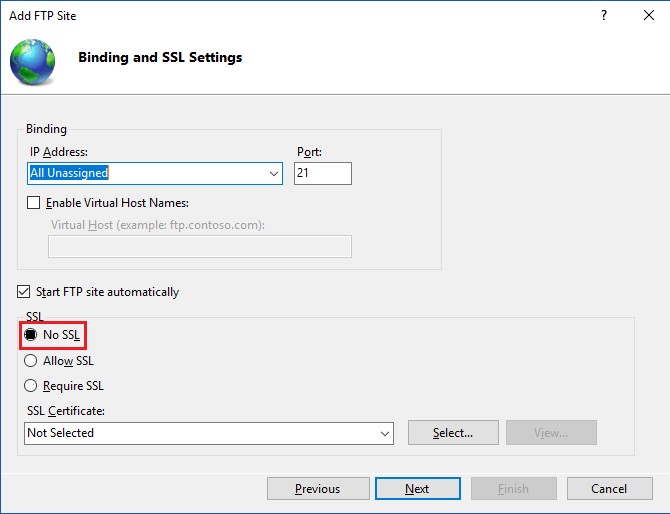
Note: It is better to configure site which needs SSL, if your server will store confidential data.
- Click Next.

- Under “Authentication”, put a checkmark beside Basic option.
- Also under “Authentication” use drop-down menu, & click Specified users.

- Type the email address of your Windows 10 account or local account name to allow yourself access to the FTP server.
- Put a checkmark besides Read and Write.
- Click on Finish button to complete the process.
Once you are done with the steps, the FTP site should work on your Windows computer.
Step 2: Configuring firewall rules
Now, let’s proceed to configure firewall rules on Windows 10. The connections to the FTP server are blocked if you have inbuilt firewall. So, you need to manually allow the connections, to do that follow these steps:
- Go to search bar and type Windows Defender and select Windows Defender Security Center and press enter.

- Locate Firewall & Network Protection from the left hand side pane and click on it.

- On Firewall & Network Protection window, click on option “Allow an app through Firewall”

- Click Change settings radio button.

- Find and put a checkmark beside FTP Server option and provide Public and Private access.
Now, FTP server has become accessible from local network. If you are running any other security app, then you need to go to developer website to look for options to add firewall rules.
Step 3: How To Allow External Connections?
Next step will be to make FTP server available for others via internet, for that, you need to open TCP/IP 21st port on router.
Note: To open 21st port of a router, steps will be different depending on router and firmware version.
We have mentioned common steps that are used to allow external connections, however, you can also check with your manufacturer website. Let’s proceed:
- Click on Start button and then Settings.

- From Settings, click Network and Internet.

- Click Status from left hand side pane.

- Locate “Change connections properties” link and note down IPv4 DNS server, the address of router.

- Open a web browser and enter the IP address that you noted down in the address bar and hit Enter.
- You will be prompt to enter your username and password.
- Go to Port forwarding page located under either Advanced settings or WAN.
- Now add new rule allow incoming connections to FTP server by:
- Service name: Enter a name that you want to keep for the Port.
- Port range: 21.
- Local IP: FTP server IP address on which the router will send incoming connections.
- Local port: 21.
- Protocol: TCP.
- Once done, click on Add button and then Apply button to save the changes.
Now whenever incoming connection will come on port 21, it will send ahead to FTP server to establish network session.
Step 4: How To Setup Static IP Address?
If your purpose of creating an FTP server is to send or receive files on internet, then you should configure a static IP address so there is no need to configure router again in case IP of your device changes.
1. Type Open Control Panel in the search bar and hit enter.

2. Click Network and Internet->Network and Sharing Center from Control Panel window


3. Locate Change adapter settings from left hand side of the panel.

4. Now do a right-click on the network adapter, and then click Properties.
5. Choose Internet Protocol Version 4 (TCP/IPv4).
6. Click Properties.

7. Click on the radio button to select “Use the following IP address”.

8. Under this, there would be options such as IP address, Subnet Mask, Default Gateway and Preferred DNS server. IP address: Enter static network address for your computer. Subnet Mask: for a home network, the address mostly used 255.255.255.0. Default Gateway: IP address of router. Preferred DNS server: Enter IP address of your router here too.
9. Click OK and then Close.
Now your IP configuration will remain static and you will not face connectivity issues.
 8 Things to Disable On Windows 10Windows 10 came with a lot of features, some of them are really useful but others can really frustrate you...
Step 5: Setup Multiple FTP Accounts
After creating an FTP server, you can allow people to upload and download files from it concurrently. For that, you have to create multiple accounts along with limited permissions.
To make this happen, first you have to create Windows 10 account and
This process is done by creating new standard Windows 10 accounts with the right settings.
Create New User Accounts:
- Click Start menu and select Settings.

- Now from Settings-> choose Accounts

- Click “Other People”

- Look for “Add Someone Else To This PC” and click on + button beside it.

- Now enter a user’s Microsoft account address to whom you want to give permission to access FTP server.

- Click Next
Note: If you want a user with local accounts to access FTP server, then choose “I don’t have this person sign-in information” followed by Add a user without a Microsoft account. To complete the process, follow the onscreen instructions.
In this way, you can create multiple accounts by using the process.
Step 6: Configure User Accounts To FTP server:
To allow other users to give permission to access FTP server, you have to make changes to the server settings. To do that, follow these steps:
- Go to search bar and type Control Panel to open it.

- Now click System and Security.

- Click Administrative Tools.

- You will get a list of tools, navigate to IIS (Internet Information Services) Manager shortcut. Double click on it.

- Locate Sites from left hand side of the window and expand it. Now select the site that you created previously.

- Now go to FTP Authorization Rules and double click on it.
- Click Add Allow Rule from right hand side panel.

- Now, you will be given with two options:
1. All Users: It enables all users to access FTP server provided they are configured on your Windows 10 PC.
2. Specified Users: If you want some selected users to use your FTP server, then choose this option. (To allow the users, key in usernames, each separate by a comma)
- Now put a checkmark beside Read and Write and click OK.
Now, users selected will be able to upload and download files on FTP server remotely.
Step 7: Connect to FTP server remotely
Till now, you have learnt how to create FTP server and how to create accounts, handle their permissions. Now, let’s know how to use FTP server to upload and download files remotely.
How To Browse and Download Files On FTP Server?
To view and download files, use Internet Explorer, MS Edge, Chrome or Firefox.
- Launch your preferred browser and type in the IP address of the server with ftp:// and hit enter. Now key in your account username and password.
- Click Login
Now you are in FTP server, locate files that you want to download. If you are connecting to FTP server from internet, you need to mention the Internet IP address of that network hosting your FTP server.
If you don’t know your public IP, just do a web search by typing what’s my IP. However if you have specific IP address provided by internet provider or don’t have DDNS service, you might have to monitor your public IP address frequently, whenever you want to connect.
Viewing, downloading, and uploading files
You can use File Explorer to download, browser and upload files easily.
- To open File Explorer, press Windows and E together.
- Now type your FTP server address via ftp:// in the address bar.
- Type your user name and password.
- Put a checkmark to Save Password option and click on Logon.
Now, you can access and browse, upload and download folders and files on your FTP server, just as you do on local storage.
To Wrap Up:
In this way, you can configure a FTP server on Windows 10 and make changes in the FTP server settings to allows users to use it remotely.
Note: In order to access FTP server on Windows 10, you need to make sure that hosting device is turned on. This is because you can’t connect while the computer is in Sleep or Hibernation Mode.

 Subscribe Now & Never Miss The Latest Tech Updates!
CJ
This is the best FTP server setup instruction I have ever seen, very much appreciated, thanks.Mridula Nimawat
Thanks for appreciation.Alan
Brilliant Easy To Follow Guide – Well Done and Thanks..Li You
Excellent IIS FTP server setup instruction, it is very clear and easy to understanding for me. Thank you!Mridula Nimawat
Glad it helped.