
Computer Data includes all sorts of files like Images, Video, Audio, Documents, Compressed files, and anything and everything that is stored digitally. Data Loss is a terrible situation where one loses all the precious data that has been stored digitally on SD cards, Pen drives, Hard disks, etc. In this guide, we are focussing on data loss of images, photos, and your precious memories and how to recover those lost photos.
Before we start the process of trying to get back deleted photos, let us understand the different possibilities of the data loss of your photos. It can be from your Pen Drive, SD card on the camera, or External Hard Disk. The process of recovering deleted images is the same on any storage medium and requires the usage of powerful photo recovery software like Systweak Photos Recovery that would scan the deepest sectors of your storage device and pull out the images hidden within.
Causes of Image Data Loss
Human Error: This includes pressing the wrong button (Delete) by mistake, unintentionally.
Device Error: This includes all the errors that could have been done by the device like a camera while storing the images in the SD card which includes naming them, creating an index, replacing images on already existing images, etc.
Storage Error: This includes the faults in manufacturing or damaged sectors on the storage device itself.
However, with innovations in technology the probability of Device & Storage errors has been greatly reduced but it does not mean that it cannot happen. As far as Human errors are concerned, the only way to avoid them is by staying calm at all times and thinking twice before acting.
How is an image stored on your Storage device?
When you click or save a photo on your computer or an external storage device like an SD card, there are two entries made for every image. One is the actual photo and the second is the name, location, and other details of that particular image. When a file is deleted, only the information about that image is deleted while the actual photos remain on the storage device. The image data is not purged and remains intact.
Now when you store a new photo on the same storage device it would look for a space or look for spaces occupied by those images whose index information has been removed and replaces them. Hence, this brings us to the conclusion that there are greater chances of recovering photos that have been recently deleted and no activity has been carried out hereafter.
Prerequisites Before Trying To Recover Your Images And Photos
Photo Loss is a common issue that has been faced by thousands of people and it is something that cannot be avoided even if you use the best storage device available. Taking a backup of your images on a cloud storage service or a secondary backup storage device is recommended and are the best ways to minimize the damage that can be caused by image data loss. But this is not always the case as there can be certain images that were recently clicked and were not backed up.
When you find missing photos, corrupted images, or files that refuse to open, then know that there is a possibility of data loss and ensure that you remember the following points and act accordingly.
- If it is a removable storage device connected to your PC or any other device, then eject it immediately and stop using it. Make sure that no activity, especially copying or saving any sort of new data takes place on that storage device.
- If you get a prompt asking you to format the card as it is unusable, do not format it.
Note: Formatting a storage device reduces your chance of recovering deleted data to a greater extent.
- You might also get prompts that would suggest different ways to resolve this error by analyzing the storage device and performing certain actions. Reject all these prompts and do not click on the Next button.
- Do not use any sort of manufacturer’s software or third-party apps to fix this issue for it might stabilize and format your storage device and may cause a permanent loss of your photos.
- If you find almost all your photos with a few missing only, it is recommended not to browse those existing photos, edit or move them. You could try to copy all the contents and paste them onto a different drive to save that can be saved and then remove the corrupted storage device immediately.
How to Recover Photos After a Data Loss
The next step after you have disconnected your storage device with lost photos is to download and install Systweak Photos Recovery Software that can help to recover your lost photos. Once you have the software installed, connect the storage device and ignore all the prompts that may appear from your operating system about disk corruption and formatting the drive. Cancel all those prompts and follow these steps mentioned below.
Step 1: Download the Systweak Photos Recovery application by clicking on the button provided below.

Step 2: Double click on the file downloaded to commence the installation process.
Step 3: Carry out the on-screen instructions with positive responses to complete the process.
Step 4: Once installed, open the program and then locate your device under Hard Drives or Removable Drives.
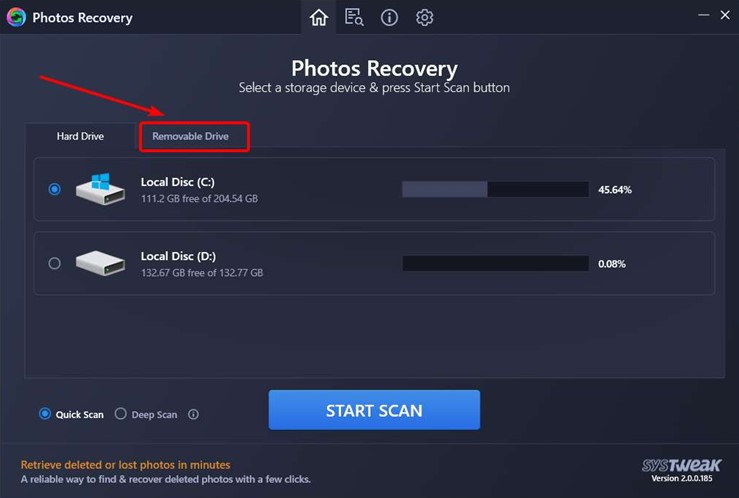
Note: Do connect your storage device to your PC before you launch the application open.
Step 5: Select the scan type from Quick Scan and Deep Scan and Click the Start Scan button.
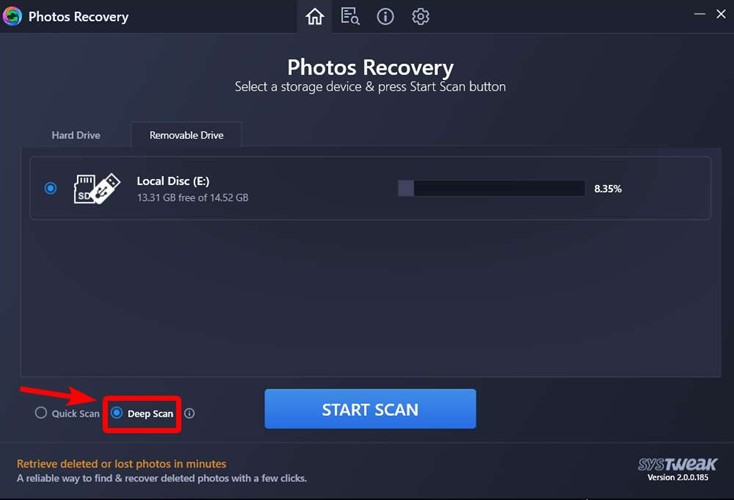
Note: It is recommended to choose the deep scan option which would take more time but scan the hidden sectors of your device and this would improve your recovery percentage.
Step 6: Wait for the process to complete. It will take considerable time depending on your storage disk size and the number of photos it finds.
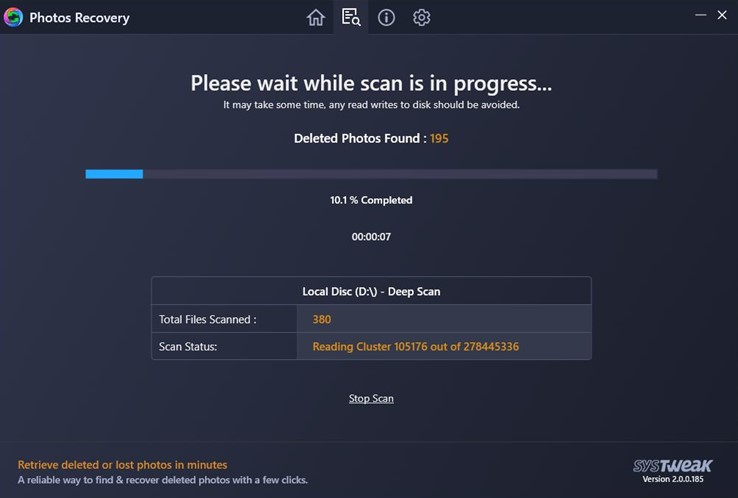
Note: You will see a Stop Scan button below, which can be used to stop the scan in the middle if you want to check the deleted photos.
Step 7: A list of recoverable photos will appear on the screen within the app interface. Select each image individually or click on the Select All checkbox on the top next to Name Tab and then click on the Recover button at the right bottom corner.
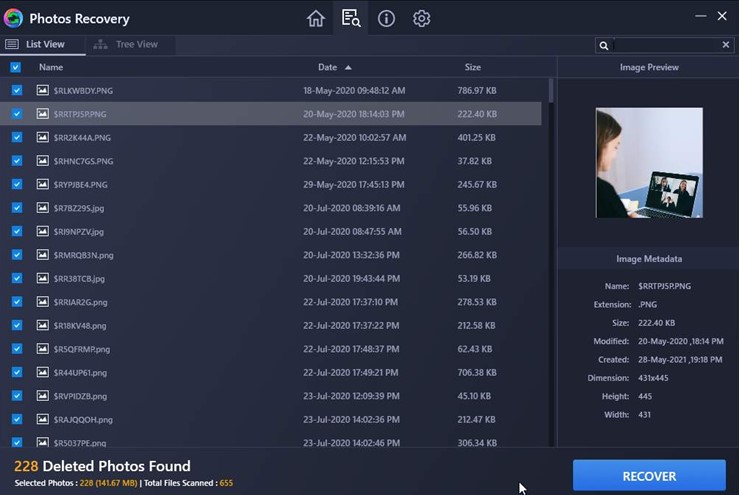
Note: This application provides its user the chance to preview the recoverable image by making a right-click on it.

Step 8: The next step involves selecting a folder to store your recovered images followed by a click on the OK button.
Note: Make sure that the destination folder of the recovered images is always different from the source folder and if possible try to save it on a different drive for now. You can copy them once you have recovered all your images after the format of your storage device.
Step 10: The process will take time to pull out all your deleted photos and store them in the destination folder you have chosen.
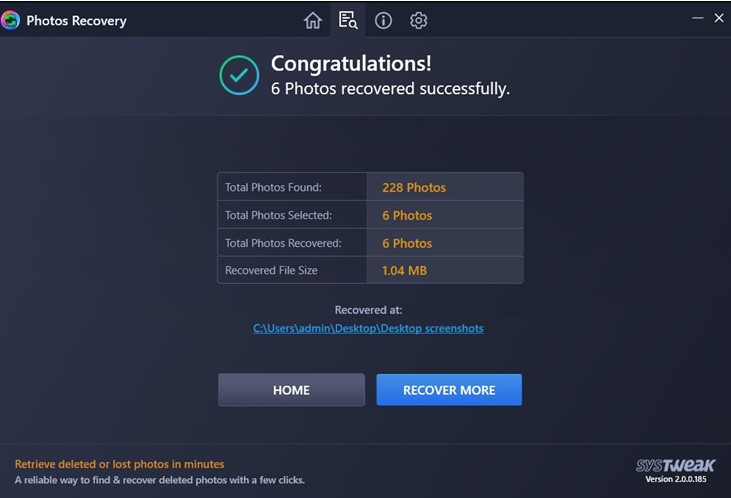
And with a powerful application like Systweak Photos Recovery and a bit of luck, of course, you would have all your photos in no time.
The Final Word On How to Recover Photos After a Data Loss
Recovering your precious memories after a data loss is not guaranteed 100% but chances improve if you have followed the prerequisites and use Systweak Photos Recovery for Windows. This process might seem very easy while reading this article but in reality, it is not. However, lost data can be recovered if the correct technique and appropriate tools are used and this has been achieved by many users across the world. In the end, we would always recommend taking a backup of your files on a cloud storage device like Right Backup that can be accessed from any device and location provided you are connected to the internet. Follow us on social media – Facebook, Twitter, Instagram and YouTube.

 Subscribe Now & Never Miss The Latest Tech Updates!