
VLC Media Player is one of the best media players that come with tons of mind-blowing features and functions. Moreover, this is the most common player that is installed on most windows computers. Apart from playing most of the media video and codecs formats, VLC Media Player offers to record desktop screen as well. With Windows, you don’t get the facility to record your computer’s screen by default so this software can be useful.
In this post, we’re going to discuss how to record your screen with VLC media player on Windows 10, 8 and 7.
Record Your Screen With VLC Media Player On Windows
Recording your computer’s screen using VLC player is one of the easiest and simplest way to capture whatever is going on your screen. You can use the inherent feature ‘capture devices’ of VLC media player that should be enabled to get it done seamlessly. You can easily get the “Open Capture Device” feature from Media.
Follow the below-mentioned instructions to record your computer’s screen straightforwardly.
Step 1: Install VLC Media Player in case you haven’t installed it yet.
Step 2: Access VLC Media Player and click on “View” tab.
Step 3: Choose “Advanced Controls” from the drop-down list.

Step 4: Select “Media” and then choose “Open Capture Device”.

Note: You can directly access the capture device dialogue box on your screen by pressing Ctrl + C keys.
Step 5: Select “Desktop” beside the Capture mode and you can choose the “Desired frame rate for the capture”. You can select between 10 – 15 fps works to get the normal and decent work frame. However, please keep in mind using the higher frame rate will surely deliver a smoother video but these large file size needs a lot of processing power.

Step 6: You need to click on the tiny arrow facing in downwards direction and choose the last second option “Stream”.

Step 7: After selecting Stream, you’ll be prompted with a “Stream Output” window, just click on “Next”. Now, you’ll notice Destination setup, there you need to select the “File” and “Add” beside “New Destination”.

Now, you need to select the location where you would like to store the file and you can name the file as per your choice.
Step 8: After performing the above steps, Click on “Next”. Choose the default format (default H264 video) if you don’t have any idea about video codecs and again click on “Next”.
Step 9: VLC Media Player will warmly begin with your screen recording the moment you click on “Stream” button.
To know for sure that your Desktop screen is being recorded, you can see the timer and the progress on it will confirm it. Moreover, you can pause the recording by clicking play button.
Any point of time you can stop the recording just by clicking the red button “Stop” from Advanced Controls. You can choose the location where you want to keep the recording. To locate the recording, you need to locate the name of the file to access it.
Capture VLC Screen With An Audio
If you’re recording your computer’s screen with VLC Player then it won’t be capturing your screen with an audio. To capture VLC screen with an audio, you need to make some changes in the settings to select the audio format.
Step 1: Press CTRL + C to get Capturing Device windows opened on your screen.
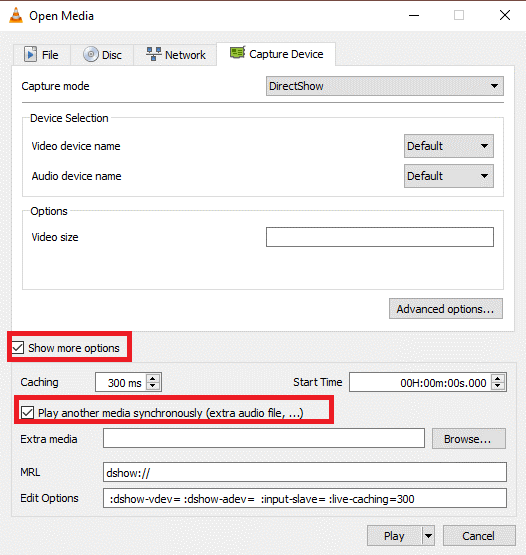
Step 2: Click on “Show more options” that is available at the bottom-left corner of the Open Media window.
Step 3: You’ll see a checkbox beside “Play another media synchronously (extra audio file), you need to mark the checkbox to add the voice file.

Now you know how to record Your screen with VLC media player with audio on Windows,10, 8 and 7. In case, you encounter difficulties while recording your desktop screen, please feel free to leave your comments in below section.

 Subscribe Now & Never Miss The Latest Tech Updates!