
Do you know how to record gameplay on Windows 10? If not, here is a tutorial to record your gaming.
Windows 10 includes a built-in tool which allows you to take screenshots and record Gameplay while playing videos games. Using this tool, gameplay video footage can be easily shared on YouTube or any other website that supports video-sharing to entertain viewers or just keep the clip on your own PC and share it with your friends.
You can do all this thing with the “Game bar “which is used to record gameplay video footage and take screenshots of Windows PC games. The Game bar generates screenshots in PNG format and videos in MP4 format.
How To Enable Game Bar In Windows 10:
You need to Enable the Game Bar on your Windows 10 PC to take screenshots and Record Gameplay in Windows 10.
- Click on the Start button and then click on Settings represented by a gear icon.


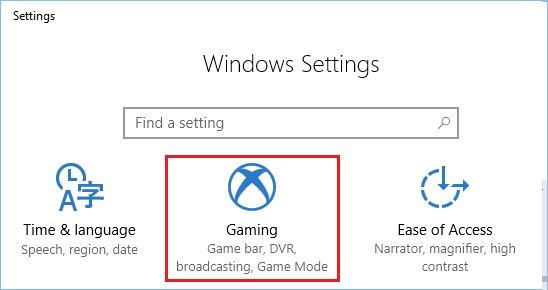
- From the Settings window, click on Gaming.
- In the next window, locate Game Mode option from the left panel and click on it. Now, from the right panel toggle on Use Game Mode.
- Now, click on Game Bar and toggle on Record Game Clips, Screenshots, and broadcast using Game bar.


Now, you will be able take Screenshots and Record Gameplay clips.
How To Record Gameplay Video:
While you are playing and you wish to record your gameplay using the GameBar, you can follow the steps below:
- While in the game, press Windows Logo + G keys on the keyboard of your computer to fetch the Game Bar.
- In case you see “Do You want to open Game bar? “then check mark the option, Yes, this is a game.
- Once the Game Bar comes out, click on the Red Sphere to start recording. Once you click on the red sphere the gameplay will start recording and the game bar will disappear.
- To stop recording, press Windows + G keys again in order to fetch back the Game Bar and then click on the Red Sphere again.
- You can see the saved Videos using the following path –
C:\Users\Username\Videos\Captures.


Note: You can also tap Win+Alt+R keys to start and stop recording during Gameplay.
How To Take Screenshots During Gameplay:
Game Bar also allows you to take screenshots during Gameplay. To do so, please follow the steps below:
- Press Windows Logo + G keys to get up the Game Bar.
- In case you see “Do You want to open Game bar? “then Check mark the option, Yes, this is a game.
- Now, click on the Camera icon or use Windows + Alt + Print Screen key combination to take a screenshot.
- You can access the saved screenshot using the following path – C:\Users\Username\Videos\Captures.

Recording Gameplay in Windows 10 is pretty easy. Thought third party software provides extra features, but the come with many terms and conditions applied. So why not use the default features of Windows 10 to have our gameplays recorded.

 Subscribe Now & Never Miss The Latest Tech Updates!