You’ve certainly heard the term cookie. Well, we are not talking about those crunchy and sweet ones, but the ones that your web browser uses. Cookies are the little snippets of data that save information about you and are used to track your browsing patterns. Several users believe that cookies have a darker side. They are overused to record web activities and bombard users with annoying advertisements. But at the same time, these web cookies are responsible for making your online experience easier and more convenient.
Additionally, when you enable cookies on Mac, all your personal preferences are saved such as email addresses, passwords, or saved shopping cart items, etc. Hence, allowing cookies help in saving your time that can be wasted in requesting information multiple times.
Must-Read: FIXED: Mac File Sharing Not Working (Catalina, Mojave, or Big Sur Users)
How To Enable Cookies On Mac
So, without wasting more time, let’s take a look at the step-by-step instructions for enabling cookies on Mac using Safari, Chrome, and Mozilla Firefox.
Step-By-Step Method: How To Allow Cookies On Mac Using Safari Web Browser? (2022)
This is what you need to do if you wish to enable cookies on Mac’s default browser – Safari:
STEP 1 – Open the Safari window and navigate to the Safari menu section located at the upper-left corner of the screen. From the drop-down dialog box, you need to select the Preferences option.
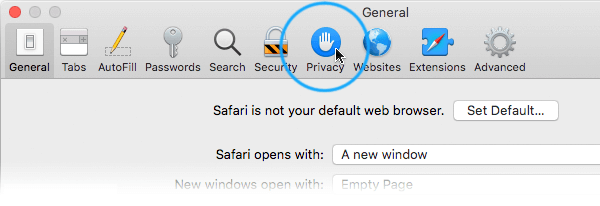
STEP 2 – As soon as the Preferences window appears on your screen, you need to head towards the Privacy tab. You can see the screenshot shared below to get a clearer idea!
STEP 3 – At this step, you will find checkboxes such as Website Tracking and Cookies and website data.
STEP 4 – Now you need to simply clear the checkmark next to Block all cookies. Doing so will help you enable cookies on Mac in the Safari browser.
That’s it! You can close the Preferences window to successfully save your changes.
Must-Read: How To Delete Text Messages On Mac
Step-By-Step Method: How To Enable Cookies On Mac Using Google Chrome Web Browser? (2022)
This is what you need to do if you wish to allow cookies on Mac using the Google Chrome web browser.
STEP 1 – Launch Google Chrome browser on your Mac.
STEP 2 – Hit the three-dots icon, located at the top-right corner of the screen.
STEP 3 – Hit the Settings option from the context menu and locate the Advanced settings option. Further, you need to select the Privacy and security option.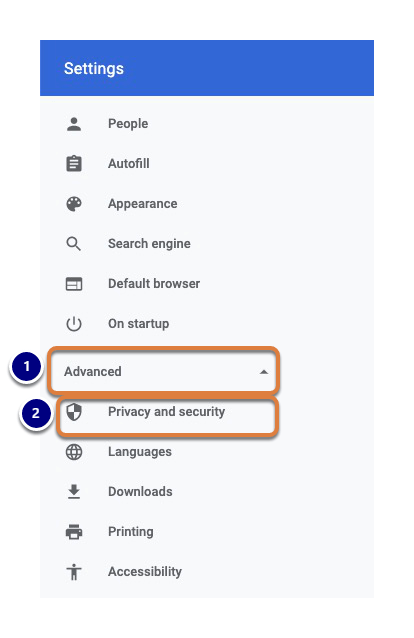
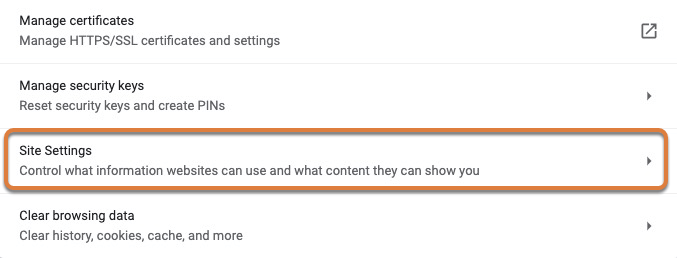
STEP 4 – At this point, you need to choose the Site Settings.
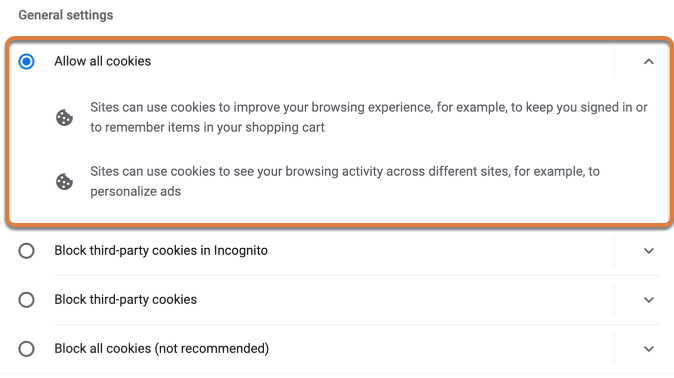
STEP 5 – Now simply select the Cookies and site data option and click the radio button next to Allow all cookies.
Additionally, if you wish to store the cookies only until your browser is active, you can alter certain settings. Under the Advanced header, you need to find the option Clear cookies and site data when you quit Chrome. As soon as you find it, move the slider to switch on the settings. Move ahead to the next section to learn the entire process of allowing cookies on Mac while using Firefox.
You might want to read:
- Quick And Simple Steps On How To Clear Cache And Cookies In Chrome?
- How To Disable Cookies In Google Chrome
Step-By-Step Method: How To Enable Cookies On Mac Using Mozilla Firefox Web Browser? (2022)
Simply follow this step-by-step manual to learn how to allow cookies on Mac while using Firefox browser:
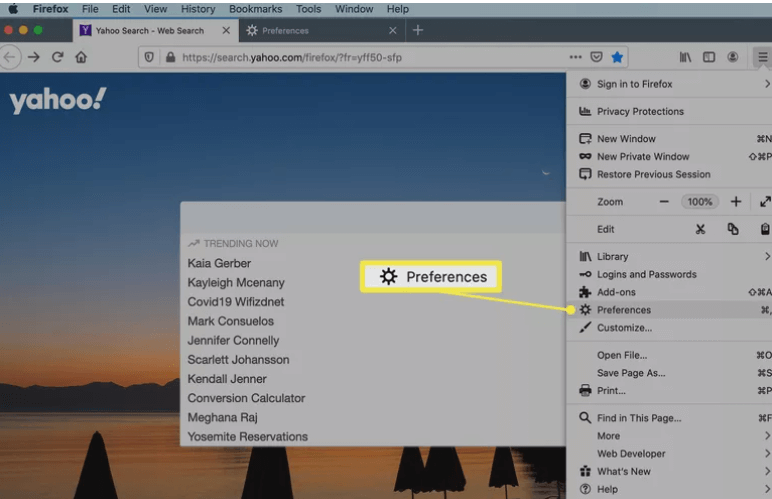
STEP 1 – Launch Firefox browser and from the settings menu, choose Preferences.
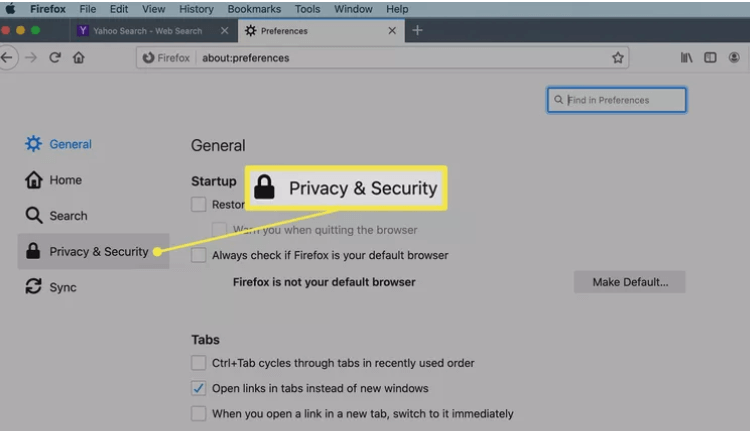
STEP 2 – As soon as the Preferences window appears, locate and hit the Privacy tab from the left-side panel.
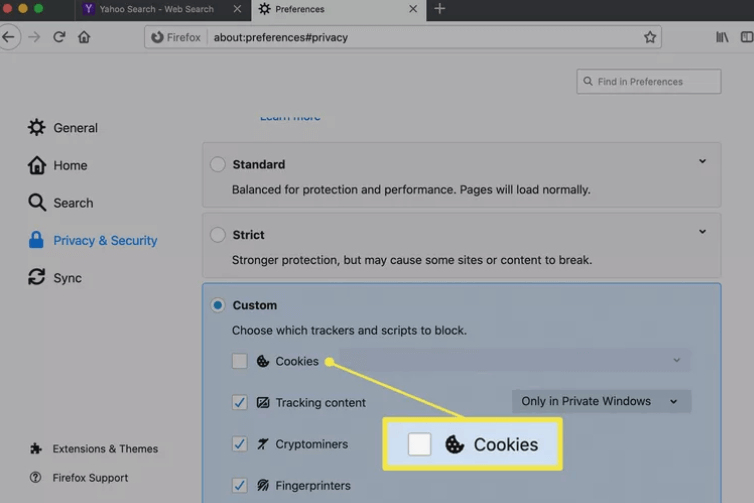
STEP 3 – If you are unaware, note that Firefox blocks cookies by default. Hence, when you need to enable cookies on Mac in Firefox, you need to make alterations in the Custom section. Simply, unmark the check next to the Cookies option.
That’s all! You’ve successfully allowed cookies on Mac while using the Mozilla Firefox web browser.
Enabling Cookies on Mac will certainly help you streamline your web browsing experience effortlessly. If you have any doubts, you can mention your queries in the comments section below. Alternatively, you can write to us at support@wethegeek.com



 Subscribe Now & Never Miss The Latest Tech Updates!