
With malicious content flowing everywhere, to stay protected against threats you must have anti-virus or a protection tool running on your computer, right? But sometimes doing so could add fuel to the fire, as some antivirus takes up a significant amount of memory, thereby slowing down the computer’s performance. With that said, if you are looking for the best antivirus tool that is light on system resources and offers excellent system protection try Systweak Antivirus.

What is Systweak Antivirus?
Developed by Systweak, a company well known for its optimization and security tools, this antivirus software is compatible with all Windows versions. Alongside it offers real-time protection, malware protection, and exploit protection. So, if you want to protect your system from malware threats, viruses, infected startup items try using this advanced virus protection tool.
To know more about it, read the comprehensive review on Systweak Antivirus.
Well, if you are thinking of using Windows native security app, Windows Defender, let me explain a few things about it.
Shortcomings of Windows Defender
Although Windows Defender is quite a robust security tool, it doesn’t protect against new malware, web monitoring, and more. Therefore, Windows Defender fails to provide all-round protection. In addition to this, if you are short on resources or want to give other antivirus applications disabling Windows Defender is suggested. Doing so will save you from any kind of software conflicts.
Note: Instead of explaining how to uninstall Windows Defender, we are talking about disabling it because you can’t uninstall Windows Defender.
So, let’s learn how to disable Windows Defender in Windows 10.
Ways to Disable Windows Defender
You can disable Windows Defender using three methods:
Note: Some of these methods could permanently disable Windows Defender.
Method 1: Windows Security
This will disable Windows Defender temporarily when you want to make changes, which could otherwise be hindered.
Step 1: Go to Start-> Type Windows Security and press Enter to get Windows Security.

Step 2: Click Virus & threat protection.

Step 3: Under Virus & threat protection settings, click Manage Settings.

Step 4: Disable Real-Time protection by clicking the toggle switch.

Once done, the antivirus will disable the real-time protection letting you install apps, do certain tasks that were not allowed earlier.
You can enable Windows Defender once your work is done or leave it as it is.
Note: This method only works until the next login. As you restart your computer, the settings will go to basic, which is, Windows Defender enabled.
Method 2: Using Group Policy
If you have Windows 10 Pro and Enterprise, you can use Local Group Policy to disable Windows Defender. To do that, follow these steps:
Step 1: Press Windows and R to get a Run box and type gpedit.msc to launch Group Policy Editor.

Step 2: Navigate to Computer Configuration-> Administrative Templates-> Windows Components-> Windows Defender Antivirus
Step 3: Locate Turn off Windows Defender Antivirus.
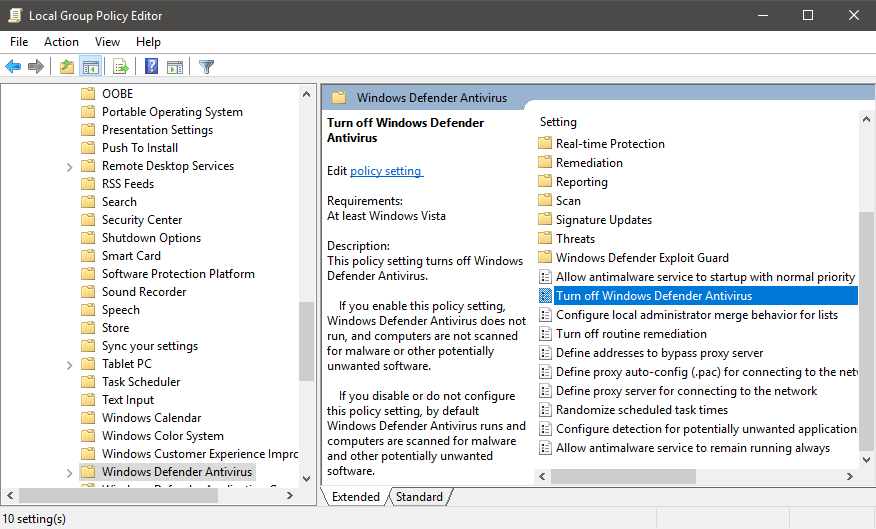
Step 4: From the new window, click on the radio button beside Enabled to get it done.

Step 5: Click Apply and OK.
This will permanently disable the feature unless you change it.
Method 3: Use Registry
You can use Registry Editor to disable Windows Defender. Before going further make sure, you take a backup for Registry Editor as a wrong action could let your device malfunction.
Steps to take a backup of Windows Registry
Step 1: Press Windows and R and type regedit and press enter.

Step 2: On Registry Editor, go to File-> Export.

Step 3: A window will open to save the backup of registry files on your preferred location.

Disabling Windows Registry via Registry Editor
Step 1: Press Windows & R to Run window and type regedit.

Step 2: Go to HKEY_LOCAL_MACHINE->Software->Policies->Microsoft->Windows Defender.
Step 3: On the right side of the panel, locate Default.

Step 4: Right-click on the right side of the window and click New->DWORD(32-bit) value

Step 5: Name the key “DisableAntiSpyware” and press Enter.
Step 6: Once the file is created, double click it & set the value to 1
Step 7: Click OK to confirm and restart your computer.
In this way, you can disable Windows Defender on your desktop. This will disable the app, but it will not uninstall it as it is a native app of Windows.
Additional tip
To get Windows Defender back, follow the steps below:
Step 1: Press Windows & R to Run window and type regedit.

Step 2: Go to HKEY_LOCAL_MACHINE->Software->Policies->Microsoft->Windows Defender.
Step 3: Locate and right-click DWORD file and click Delete to remove it. Restart Windows to let the changes take effect.
Wrap Up
So, these are the methods to disable Windows Defender on your Windows 10 computer.
If you still have doubts and are thinking about whether to disable Windows Defender or not try using Systwek Antivirus. The best part about this security tool is that it doesn’t conflict with Windows Defender. Also, it protects the system from computer viruses, malware, ransomware, and other malicious threats.
Liked the article? Please share your thoughts in the comments section below.

 Subscribe Now & Never Miss The Latest Tech Updates!