There are many instances when you want to post your beautiful pictures online, share on social media accounts or send it to your friends but avoid disclosing the location. This information from the picture discloses your vulnerability to various thefts or stalking and obviously, it’s better to stay cautious before. So through this, let’s explore how to remove geotags from your phone’s pictures.
Geotagging is knowingly or unknowingly a potential security risk. For example, you are posting a picture with your baby alone at home and posing just for some attention, but the thieves may sense it as a potent chance to rob the home! Or if you are traveling and uploading some fun moments, stalker might see it as an opportunity to get their hands on your personal details.
We certainly do not wish to demotivate you from your excursions, but this is certainly a possibility that can be avoided. It is definitely best to remove GPS tag from your photos and other Exif data today!
How To Remove Geotags From iPhone ?
These steps to remove geotags are quite simple, follow them and secure your space.
Step 1: Select Settings on your iPhone.
Step 2: Tap on Privacy and locate Location Service.
Step 3: From the next page, tap on Camera. Select Never!

Once changes to the settings are made, no location will be marked on your snaps. Note that if you use another camera app for clicking pictures, you need to disable location selectively.
Also, Note that if Location Service is blurred out and seems inactive, you need to lift screen time restrictions. Open Settings > Screen Time > Content & Privacy Restrictions > Location Services > Allow Changes.
 How To Remove EXIF Data of Photos Using...Do you often click and share images with your smartphone? But did you know it could contain associated information you...
How to Remove Geotags From Android?
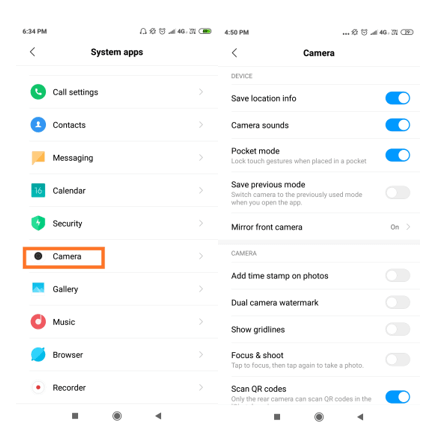
To remove GPS tags from the photos on Android phone, you can disable location universally, through the camera’s settings and from the specific photos to be shared.
Step 1: To disable camera settings, open your phone’s Settings.
Step 2: Open ‘System Apps’ and select ‘Camera’.
Step 3: Disable ‘Save location info’ to hide the location.

If you want to make changes using Google Photos before sharing on social media, follow the steps below.
Step 1: Launch ‘Google Photos’.
Step 2: Before opening any specific picture, tap on 3 lines from the top left corner.
Step 3: Tap on Settings and turn on the button of ‘Remove Geolocation’.

And it’s done!
How To Remove Geotags From PC
Photos Exif Editor by Systweak is a potential tool to remove metadata from numerous pictures at the same time.
It Works swiftly on Mac and Windows, this photo EXIF removing software has many interesting features like
- Allowing manual entry of GPS coordinates
- Deletes metadata individually as well as the whole batch.
- Automatically take the backup of original metadata before editing.
- Restores the metadata, even after changes have been already made.

 Reviewing Photos Exif Editor: Modify Metadata Without HasslePhotos’ EXIF data can be really useful for photographers but also reveals a lot of details. See how Photos Exif...
How to Use Photos Exif Editor?

EXIF or Exchangeable Image File Format specifies the information about your device, camera, and even GPS coordinates. Isn’t it good to remove them and stay safe?
Begin with the simple interface which asks you to Add Folder or Add Photos or just drag them here.
At the right panel, you can change General information, camera details, date, lens as well as GPS coordinates. Similarly, you can also make changes in XMP data and IPTC data from the same.
Once desired changes are written, click on the Start Process. You can now select the folder where photos will be saved with all changes in place! Simple and convenient it is.
To dive into details about the tool, let’s do a review of Photos Exif Editor.

Watch Video –
Conclusion
It is always better to protect your minute details from the onlookers by removing geotags as well as EXIF information and prevent any breach in your privacy. When it comes to using Photos Exif Editor, you can totally change every single detail in the metadata in just a few clicks.


 Subscribe Now & Never Miss The Latest Tech Updates!