USB is one of the handy as well as convenient device that smartphone users prefer to transfer their data from one device to another. Moreover, if you are running out of storage space then it allows you to view your files just by plugging the USB flash drive to the smartphone, which is quite cool. However, sometimes USB OTG does not get connected and there can be various reasons that can cause the connectivity issues. Fortunately, these issues are easy to fix, but before that you need to know the cause.
In this post, we’re going to discuss different ways to fix ‘USB OTG Android not working’ issue.
Reasons that can be Responsible for not Reading your USB to Android
A computer is compatible with various file formats of USB. FAT, NTFS and FAT32, are some of the examples of it. However, if you are looking forward to connecting your USB to Android with OTG, then an incorrect or different file format of USB can be an issue.
Before using OTG, you might want to check whether your smartphone supports OTG functionality. For that, check the specifications of your smartphone and also confirm USB OTG functionality.
If there are software compatibility issues then your device will detect the USB but it might not able to recognize its file format system that you are using.
Method 1: Use File Explorer to Change USB Format
You need to take a backup of your entire device or vital file data before formatting your USB.
Step 1: Open File Explorer by pressing Window + E.
Step 2: You need to select “This PC” that is available at the left-side of your screen. Then you need to right-click on the drive to check whether your USB is showing or not.
Step 3: If you can see the USB, you need to choose “Format” from the drop-down menu to format your USB.

Note: In case, you’re not aware of your USB format you can select “Properties” to view it.
Step 4: Under File System, you’ll notice a downwards arrow, just click on it and choose FAT 32.
Step 5: Once you’re done with the above-mentioned steps, you need to click on Start to go on with the process.
Step 6: You’ll be prompted with a warning window then you need to click on “Ok”.
Method 2: Set FAT 32 USB Format
It is one of the easiest ways to fix USB OTG Android not working error.
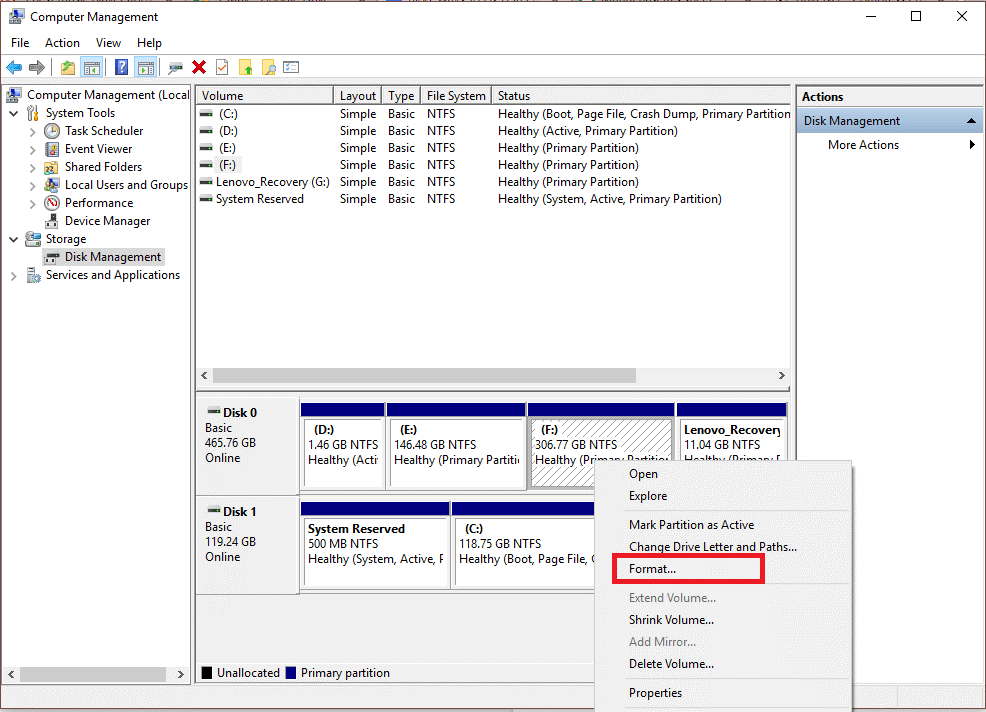
Step 1: Firstly, press Windows + D to get desktop and right-click on “This PC”.
Step 2: Select Manage.

Step 3: In the Computer Management window, select Disk Management under the Storage.

Step 4: In the center of the screen, navigate to the no. of USB and right-click on it.
Step 5: Choose “Format”.

Step 6: In the new window that opens select FAT 32 beside File system and click on “OK”.
Method 3: Fix Software Compatibility Issues
In case your smartphone supports USB OTG but software compatibility is the issue then, you need to switch to another file manager app that can figure out a way to work with other file formats of the portable devices. If you will use a capable file manager then the old, as well as a new thumb drive, will be easily detected.
Overall, now you know how to fix USB OTG Android not working error. Well, USB OTG functionality is an amazing feature that comes handy for various situations. You can also use third-party tools to transfer your data from one device to another device without the need of having a host device such as a PC like USB OTG Checker.


 Subscribe Now & Never Miss The Latest Tech Updates!