Minecraft is quite an addictive game, and it is also equally complicated. Minecraft does a decently good job at keeping players frustrated and stuck on the game and players, on the other hand, give everything into it. Now, in case, above all this annoyance, if you find your game bugged and causing app crashes, it adds up to frustration.
Several users have reported that they have been facing several issues when it comes to connecting to or adding friends online while playing Minecraft. The bug, which responds with a tag saying – Unable to Connect to World has been trapping many Minecraft players and is hampering their gameplay.
Here we’re offering some fixes that may help users in getting past this issue and continue playing Minecraft. Read ahead, and you may find a solution to this issue on your computer:

How to Fix “Unable to Connect to World” Bug on Minecraft?
1. Re-add Friend
The bug may have been caused by poor connectivity when you must be adding your friend on the game. This will cause the adding process to fail and may pop-up this particular message on your screen.
You can remove that particular friend from the friend list on Minecraft and then re-add him/her to your profile. This may be a possible solution to your issue.
Read More: How To Convert Any Video Games Into A Raspberry Pi Video Game?
2. Check Windows Firewall
It is possible that Minecraft isn’t allowed to surpass certain restrictions imposed by Firewall and this will include connecting to a different server and adding other accounts to your Minecraft profile. This allows you to play games and connect to the Internet; however, it doesn’t allow you to join or add another account into yours. Here’s how you can check on it:
Step 1: Head to Control Panel.
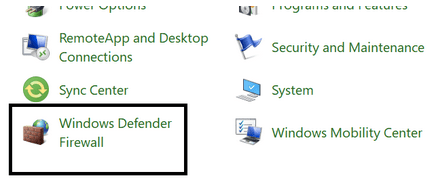
Step 2: Set the view to Large Icons. There you’ll find a separate option for Windows Defender Firewall. Click on it.

Step 3: In the left-sidebar, click on an option that says – Allow an app or feature through Windows Defender Firewall.

Step 4: See if a file called javaw.exe is checked. If not, click on Change Settings.

Step 5: If there are more than one entries for the file name – javaw.exe, ensure to check them all. Make sure both Public and Private Boxes are checked as well.

Step 6: Save the new settings.
Note. If there’s a file called Minecraft.exe and it’s checked already, you need to move to the next fix as this one may not work for you.
Read More: Have Fun Playing These PC Games Without Graphics Card On Your System
3. Change Xbox Settings
You need to keep a check on Xbox settings for allowing users to join multiplayer games. Here’s how you can do it:

Step 1: Head to the official website for Xbox.
Step 2: Head to the Xbox One/Windows 10 Online Privacy section.
Step 3: Find the option to Join Multiplayer Games.
Step 4: Enable the button for Allow.
Read More: 10 Best Games Like World Of Warcraft In 2020
4. Disable Antivirus
One of the options is to disable your antivirus software on your PC and allow removal or bypass restrictions that are causing your Minecraft account to refrain from connecting to other profiles and giving you the Unable to Connect to World bug.
But, this is an option that is not highly recommended. This is because it will make your web browsers, emails, etc. vulnerable to other threats. So, only use this option at your discretion.
Read More: How To Stop Windows 10 From Crashing When Playing Games
5. Update Network Drivers
The entire Unable to Connect to World bug can be a cause of the network connectivity issues. These issues are often calibrated to outdated network drivers. Hence, it’s always better to ensure that the network drivers are always updated to avoid any trouble with Minecraft gameplay as well. Here’s how you can update these drivers manually –
Step 1: Right-click on the Start button and select Device Manager.
Step 2: Head to Network Adapters and expand the menu.
Step 3: Right-click on the installed adapter and Update Driver.

Step 4: Click on Search automatically for updated driver software.

Step 5: A suitable driver update will be made available.
In case updating the driver manually is a hustle for you, and you still want to solve all driver-related issues at once, we recommend using Smart Driver Care. Smart Driver Care automates the process for driver update and eventually downloads and installs the new driver updates in a matter of minutes.
Read More: Best Low Spec PC Games To Enjoy Without New Investment
How to Update Drivers using Smart Driver Care?
Step 1: Download Smart Driver Care.
Step 2: Start scanning for driver updates. This will include scanning for drivers associated with network adapters.
Step 3: The scan will list all the available driver updates. All you need to do is select them all and click Update All.
All the driver updates will be downloaded and installed in time depending upon the speed of your Internet connection.
You May Also Like
Top 10 Simulation Games You Must Play
10 Best Story Games For Ultimate Drama In 2020


 Subscribe Now & Never Miss The Latest Tech Updates!