As new technology gains recognition, it replaces the older one and eventually, the latter becomes a part of tech legacy. For instance, Windows is upgrading its operating system with more advanced features and people are embracing latest storage options. However, this is not true in the case of CDs and DVDs since several users are still dependent on them for catering their storage needs. Installing Windows on computer, storing data, watching movies etc. are some of the uses of CDs and DVDs. At times, users encounter issues like losing DVD or CD drive after upgradation, CD drive not working on Windows 10 etc. In this blog, we will show users how to troubleshoot problems arising in Windows 10 CD or DVD drive.
-
Update Chipset Firmware of BIOS/UEFI Settings
If Windows is unable to detect your CD/DVD drive, ensure that the drive is in working condition and is acknowledged in the computer’s firmware. Load the UEFI firmware or BIOS interface, if it is not installed in the system. Absence of UEFI firmware or BIOS interface is not a good sign.
Also, if the computer is too old, the chipset drivers required for the motherboard might be out of date. Users can install the latest chipset by visiting the website of their computer and browsing the download section of computer’s model that the user is using. This will resolve the problem of optical drive of not being recognized by Windows. If possible, users can also check out for BIOS updates if available, as it will enhance the performance of Windows 10 in older system.
 How To Solve No Sound Problem In Windows...Use Device Manager to update the outdated driver. Type Device Manager in Windows search > Sound, video and game controllers...
-
Fixing Windows 10 DVD Drive Problems with Windows Update
Optical drive is unpredictable in nature. They work fine with every version of Windows but soon after the update, they stop working. In such a scenario, users must check Windows update first and then install the latest drivers.
Click Start > Settings > Update & security.
Ensure that the system is recently updated with no pending hardware driver updates for installation. If users have working DVD/CD, it is recommended to prevent Windows 10 from updating drivers automatically in the future.

-
Updating or Reinstalling Driver in Device Manager
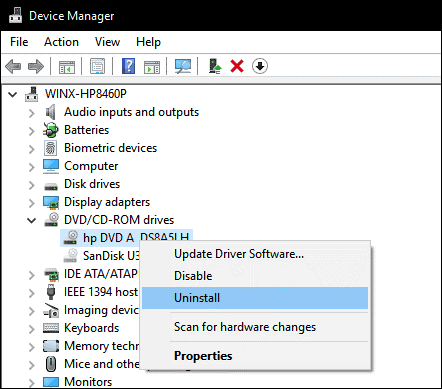
Begin with booting Windows 10 desktop and then open Device manager by clicking Windows X + Windows key. Now jump to DVD/CD-ROM drives to expand and then uninstall it by right-clicking. Next, restart your computer after taking exit from Device Manager. After the drive is detected by Windows 10, reinstall it.

Users can also opt for another option, where they must uninstall IDE/ATAPI drivers by opening Device Manager and jumping to View Menu to reach Show hidden devices. As users will expand IDE/ATAPI Controllers, they will uninstall ATA Channel 0, ATA Channel 1 and Standard Dual Channel PCI IDE Controller. Now, restart the computer for reinstalling the drive after Windows 10 detects it.

 Ways To Fix Error Code 0xc0000225 In Windows...You might have come across the blue screen on Windows displaying a message ‘Your PC needs to be repaired’ and...
-
Uninstall Virtual Drive Software
Used for mounting disc images, Virtual Drive Software is sometime responsible for creating tension with physical optical drives. Especially if users are working with software like PowerISO, Daemon Tools and ISO Recorder, it is recommended to remove them by clicking X + Windows key. Select, highlight and uninstall the program.

-
Revising Windows Registry to Repair CD Drive Problems in Windows 10
Registry entries that are corrupted creates issues in optical drives, hence, it is necessary to delete them not only for CD/DVD but for the overall health of the computer.
Before trying out the following steps, it is advised to create a backup of registry and to generate a system restore point, in case something goes wrong.
- Click X + Windows key then press Command Prompt (Admin).
- Then, insert the command given below to the prompt and then restart the computer after exiting from the command prompt.
- reg.exe add “HKLM\System\CurrentControlSet\Services\atapi\Controller0” /f /v EnumDevice1 /t REG_DWORD /d 0x00000001
- Press Start and type “regedit”
- Right-click regedit and press Run as administrator
- Jump to the given registry subkey:
- HKEY_LOCAL_MACHINE\SYSTEM\CurrentControlSet\Control\Class\{4D36E965-E325-11CE-BFC1-08002BE10318}
- Press UpperFilters in the right pane. Go to the Edit menu, press Delete and then press Yes to approve changes.
- In case of LowerFilters, every step of UpperFilters is repeated here. If there are no entry for LowerFilters, then exit the registry and restart the computer.

 How To Free Up Disk Space On Windows...Learn how to free up the disk space on Windows 10, Windows 8 and Windows 7.
All being well, these instructions can revive your optical drive. In case, none of them work, you can roll back to the older version or buy a new drive. If you are facing any errors with the above-mentioned solutions, feel free to comment in the section below.


 Subscribe Now & Never Miss The Latest Tech Updates!