Windows utilizes a page file to store memory data that cannot be stored by RAM. When you run a program, which needs more Random-Access Memory (RAM) than available on your system, then the system will change the location of the least used memory data out to a hidden file, called pagefile.sys. This allows the program that you are using to utilize more RAM.
Page file can also be called a pagefile, swap file, or paging file. It is a system file that is stored at the root path of your drive. However, you can’t see it until you enable Windows Explorer to show hidden files and protected operating system files.
If you want to know how to change, move or disable a pagefile on Windows 10, then you are in the right place!
Note: Before going further, you must know no matter how much simpler it seems to change pagefile settings, you should not proceed if you aren’t sure of what you are doing. A wrong step can cause your system to malfunction. The process is similar for all versions of Windows.
How to Change/Move or Disable Pagefile in Windows 10?
To change/move or disable Pagefile in Windows 10, you need to go to Virtual Memory settings. For that, follow these steps:
1: Open Windows File Explorer by pressing Windows and E key together.
 2: Locate This PC from the left side of the navigation pane and right-click on it to select Properties.

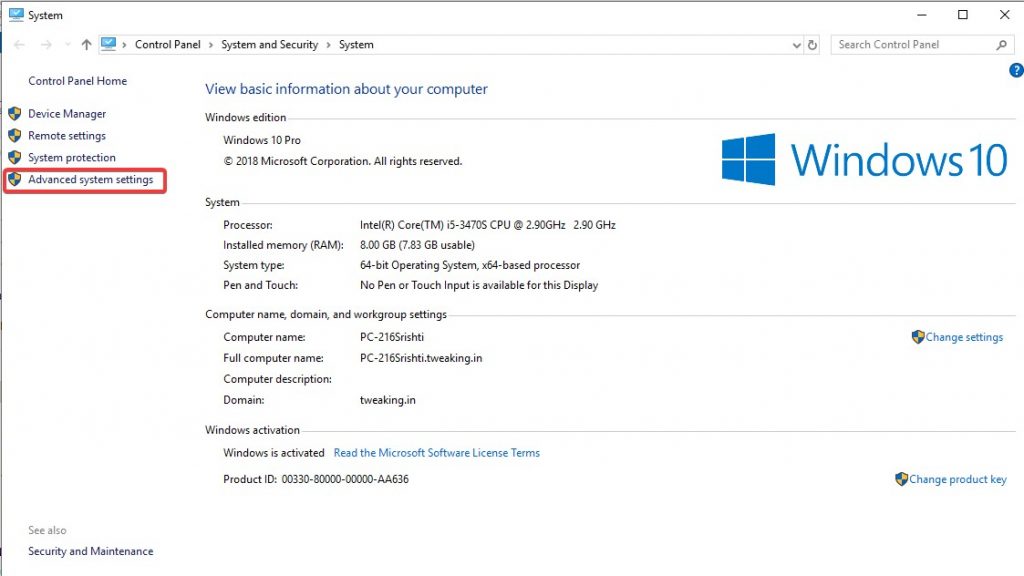
3: On the System window, click Advanced system settings located at the left-hand side of the window.

4: You will be taken to the System Properties window, click Advanced tab->Settings(under Performance)

5: On the Advanced tab, Virtual Memory section, click the Change button.
6: You will get the Virtual Memory Settings window. Here, Automatically manage paging file size for all drives option is check-marked by default. You need to remove the checkmark in case you wish to configure the page file for every drive separately.
 How to Make Your PC Run Faster By...Read this to know what Page file in Windows are and why they are important to be removed from your...
Change Pagefile Size
Select a drive for which you wish to change pagefile size. Select a Custom size. Now you will be able to add the Initial size and Maximum size for your pagefile. Click Set button to save changes.

Move Pagefile to A Different Drive
C: Drive comes with System Managed paging set. The paging file can acquire up to 8 GB of space sometimes. Therefore, you should change the location of the file from C: Drive. If you want to move the pagefile from C Drive to a different drive, then follow these steps:
Step 1: Choose the default paging file drive and locate & select No paging file and click Set.

Step 2: Next, you need to specify a new page file on another drive. For that select the drive, System managed size. Click Set to apply the changes.

For the changes to take effect, restart your computer. Now C:\pagefile.sys will be deleted and a new pagefile in another drive is created.
Option 2: Disable Pagefile
In case you just want to disable the paging file, you need to select the drive and click No paging file and click Set to let the changes take effect.

Note: To see the “Pagefile.sys.” in a drive, you need to change settings under File Explorer Options. Type File Explorer options in the search box beside the Start button and press Enter. On File Explorer Options window, Select View tab, under Advanced settings, remove a checkmark beside Hide protected operating system files.

So this way, you can change/move or disable Pagefile in Windows 10. You need to restart your computer to let Windows make the desired changes. Changing paging file settings is easy in Windows and is helpful especially if you have SSD on your computer.


 Subscribe Now & Never Miss The Latest Tech Updates!