Compressed files are beneficial for us as they help to bundle up certain files as well as save disk space. But, a lot of compressed files stored all over your computer can cause confusion as well as occupy disk space of your hard drive. This guide will help you on how to find compressed files in Windows 10 using Disk Analyzer Pro with options of copy, move, view and delete them.
Disk Analyzer Pro is an amazing application that helps to scan your entire drive and sort the files into different categories. Once the files are sorted, you can select any one of the categories at a given time and perform basic functions like copy, move, rename, preview and delete them among many other tasks. The categories that Disk Analyzer Pro sorts the files of your hard drive are listed in the table below:
| Big Files | Old Files | Compressed Files | Zero Size Files |
| Junk Files | Temporary Files | Internet Temp Files | Duplicate Files |
| Video Files | Audio Files | Image Files | Custom Sort |
The actions you can perform with each file can be better understood with the below image.

Besides the above attributes, Disk Analyzer Pro has certain other features that make it one of the must-have applications in your computer.
Easy-To-Use. This software has an instinctive GUI and is suitable to use without any training.
No Cost. A key reason for this program’s acceptance is that it is zero cost to use for personal use.
Light-Weight. This software is a light-weight program and does not require more of your PC’s resources. It is also tiny in size when installed and needs less space.
Classifies All Files. Disk Analyzer Pro can categorize all files into several groups.
Also Read: How To Compress Files In Windows And Mac
Steps On How To Find Compressed Files In Windows 10 Using Disk Analyzer Pro
Disk Analyzer Pro is an easy to use application with an intuitive interface. It can be used by anyone without any formal training and does not require any technical skills.
Step 1: Download Disk Analyzer from the official link provided:

Please Note: This Software is free to use only for personal use.
Step 2: Install the program by making a double click on the file downloaded followed by following the instructions appearing on the screen.
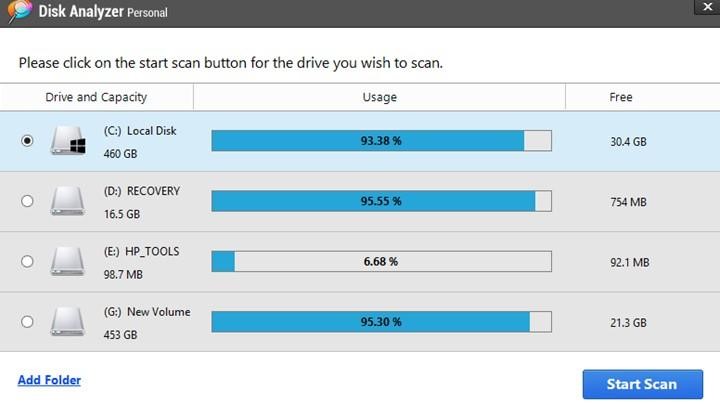
Step 3: Launch the software and select the hard disk you want to classify.

Step 4: The sorting process takes time depending on the number of files on your hard drive.

Step 5: After the classifying procedure finishes, there would be a tabular and graphical depiction of files. Click on the Files List button on the top and select Compressed Files.

Step 6: The program will display all the compressed files available in your computer. It will present the name, path, type, and various dates among many other attributes.

Step 7: Make a right click on any file and you will get a lot of options as to what action you want to perform with that file.
Also Read: 7 Best File Compression Software
The Final Word On How To Find Compressed Files In Windows 10 Using Disk Analyzer Pro
To find out the compressed files in your hard drive manually, you will have to view every folder which is not feasible or I might say not possible to accomplish. It would rather be easy to use an application like Disk Analyzer Pro that would help scan and identify the compressed files in your system.
Follow us on social media – Facebook, Twitter, and YouTube. For any queries or suggestions, please let us know in the comments section below. We would love to get back to you with a solution. We regularly post tips and tricks, along with answers to common issues related to technology.
Suggested Reading:
Here Are Top 8 Methods To Compress PDF!
11 Best Video Compression Software for Windows and Mac
10 Best Image Compression Software for Windows
5 Best Free Video Compressor Apps For Android


 Subscribe Now & Never Miss The Latest Tech Updates!
Manju Songra
I always have trouble with compressed files! Thank you for this write-up!