
Since people want to keep things organized and don’t want to mix personal with professional, they use multiple email addresses. But checking email that drops in each account separately is time-consuming and troublesome. Therefore, to help with this problem in this post, we will explain how to keep all email addresses at one place on your Mac.
In addition to this, we will also discuss how to delete email accounts that are no longer in use. For instance, if you quit a job, and you still have that account added then, how to remove it from Mail in Mac.
How to Add Email Account Manually or Automatically?
If the email account you want to add is associated with iCloud, Gmail, or Yahoo, Mail, it will automatically get added, once you provide the email address and password.
However, if you want to add an email account provided by the ISP, you’ll need to enter email account settings manually.
Step to set up an email account manually
To set up an email account manually, you need to know the following things:
- username (usually it is the email address)
- Incoming and Outgoing mail server
If you don’t have access to them you will need to contact your email provider.
POP VS IMAP
You will also need to know POP (Post Office Protocol) or IMAP (Internet Message Access Protocol) for the email account you want to add in Mail on Mac. Remember both these protocols are required to receive an email when using third-party apps like Mail.
Note: If you plan to access email on several devices like computer, phone, etc use IMAP. IMAP ensures you see the same content on all devices. However, if you just want to download and store emails on the device use POP. This is an old protocol and can be even used when you are offline.
Furthermore, POP is an email client on your PC, therefore while setting up this option make sure you checkmark the option to leave a copy of the downloaded email on the server. This way you can download the email on your mobile and can access the same on other connected devices.
How to Add an Email using Two-Factor Authentication?
2FA (Two-factor authentication) provides additional security to your online accounts. This means to access your account along with the password, you will need an access code or phone. Thereby making it difficult for hackers to access your account without your will.
If you add an account like Gmail, that offers two-factor authentication, generate an app-specific password before adding the email account to Mail. An app-specific password is a security code generated by email service to offer additional security. This means to add the account to Mail on Mac you will need this code, without which you cannot email account.
Add an Email Account to Mail on Mac
You can either use System Preferences or Mail app to add an email account result will be same.
Add an Email Account in Mail
To add email account via Mail app, follow the steps below:
1. Launch the Mail app.
2. Click Menu bar > Add Account.
3. Choose the type of email account you are adding, and follow on-screen instructions.
4. However, if you are unable to find your account type, choose Other Mail Account… > Continue.
5. Assuming you have selected Other Mail Account, you will need to enter IMAP or POP details when you receive a dialogue with “Unable to verify account name or password”.
Once additional details are provided click Sign In.
6. Upon email verification, you will be asked the app you want to use. Select the new app for a new email address and click Done.
Note: Other Account Type does not support all listed apps.

Change Account Description in Mail
All the email address added to the Mail app are displayed under Inbox. By default, your email address is displayed in the description. To change it, right-click the mail account > Edit.
Choose the mail account you want to change the description for and enter the new details.

How to Add an Email Account Via System Preferences?
Using System Preferences, you can add an account to Mail on Mac. To do so, follow the steps below:
- Click Apple Menu > System Preferences.
- Select Internet Accounts.
- Choose the type of email account, and follow on-screen instructions.
- If your account is not listed, choose Add Other Account.


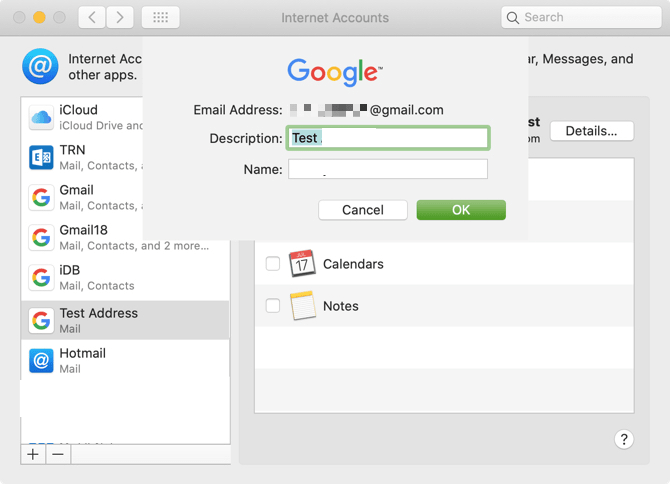
How to Change Account Descriptions Via System Preferences?
By default, you see email address as a description to change it, head to System Preferences > Internet Accounts.
Select the account to rename > Details > Enter new description > OK.
Using either of the ways explained above, you can add an account. Now that we know how to add account in Mail on Mac, let’s learn how to delete an account in Mail on Mac.
How to Delete Or Deactivate an Email Account on Mac
To delete or deactivate an account follow the steps below:
- Click Apple menu > System Preferences > Internet Accounts.
- Select the account you wish to delete and click the – sign at the bottom of the window.
This will remove the account.
How to Deactivate an Account
Rather than deleting an account if you simply want to deactivate it, Apple menu > System Preferences > Internet Accounts. Here, uncheck Mail from the right pane as you longer want to receive emails.
Using these simple steps, you can easily manage mail accounts on Mac. This is a great way to access multiple accounts in one place. The mail app provided by Apple automatically adds. Google, AOL, Yahoo, etc. However, if you don’t see your account provider on the list, you can add it manually. This means it doesn’t matter what email account you are using you can add all to the Mail app in Mac.
We hope you enjoyed reading the article. Do share your thoughts with us, this helps us to learn and improve.

 Subscribe Now & Never Miss The Latest Tech Updates!