The Windows 11/10 operating system has a fantastic feature that can be used to store your username and passwords for logging into websites, applications, and networks. This feature can be used only when using Microsoft Edge and if you check the box that allows the Windows Credential Manager to save the username and passwords for future logins. The Credential Manager in Windows 10 works similarly to the Google Chrome password-saving feature and allows the users to check, modify, and delete any existing login credentials.
Also Read: TweakPass: The Ultimate Password Manager
How To Use The Credential Manager In Windows 11/10 PC (2022)
The Windows Credential Manager has been inculcated by Microsoft for a long time, and apart from saving your credentials it also lets you edit, delete, add backup and restore all the saved usernames and passwords on your computer. Open the Control Panel and simply change the “View by” to Large icons and you will see a variety of options, including Credential Manager.
![]()
Also Read: How To Login to Windows 10 Without Password
How To Edit Credentials Using Credential Manager In Windows 11/10 PC?
If you have certain log-on information saved into the Windows credential manager, then you can edit it with the steps mentioned below:
Step 1. Type “Control Panel” in the search box on the taskbar and open the Control Panel window.
Step 2. Now, click on User Accounts and then click on Credential Manager.
Step 3. Locate and select the Windows Credentials tab or Web Credentials.

Step4. Choose your account and click on the Edit button under it.
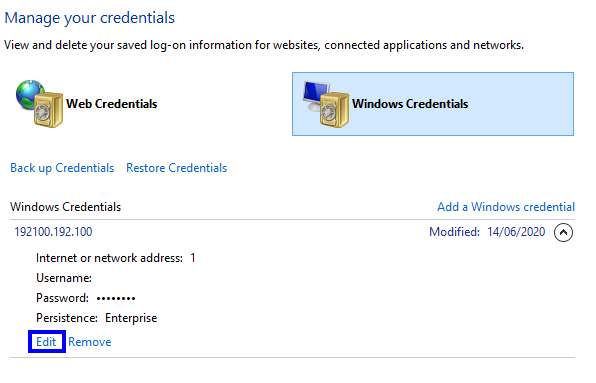
Step 5. Now you can change the username and password and set it to the new credentials and finally, click on the Save button.
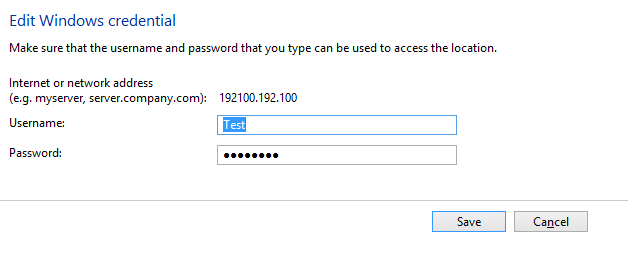
Note: These steps can be repeated for all the entries listed below one by one and update every credential stored in the credential manager for Windows 11/10.
Also Read: How To Change Windows Password Without Knowing The Old Password
How To Delete Credentials Using Credential Manager On Windows 11/10 PC?
Now it’s your wish to remove a set of credentials from your computer then you can follow these steps:
Step 1. Open Control Panel and select User Accounts.
Step 2. Click on Credential Manager and choose the entry from the Windows Credentials tab or Web Credentials.
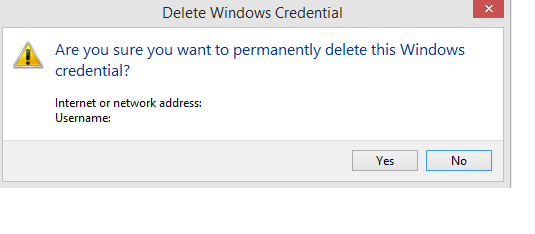
Step 3. Select the account and click the Remove button underneath it. If you get a prompt for one final confirmation, then click on Yes.
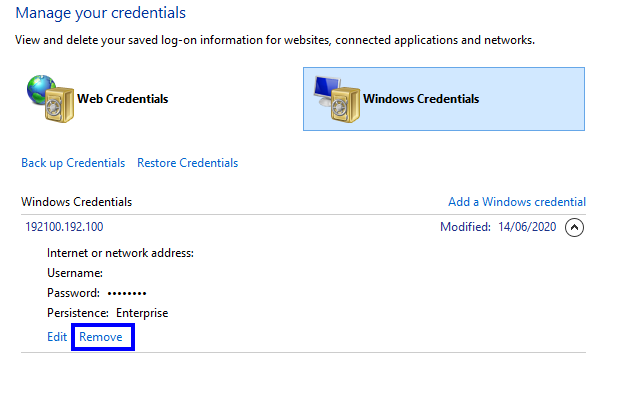
This will ensure that all the information related to a particular credential will be removed forever.
Also Read: How To Create Strong Passwords And Remember It?
How To Add New Credentials Using Credential Manager In Windows 11/10 PC?
If you want to add a new set of credentials that will let you auto-login without having to enter your username and password again and again then here are steps for accomplishing that:
Step 1. Launch the Control Panel and select User Accounts from the list of options.
Step 2. Click on Credential Manager and choose the Windows Credentials tab.
Step 3. Locate the “Add a Windows Credential” option on the right side and fill in the required information.


Step 4. Click on the OK button, and this new credential information will be useful when you want to sign in the next time.
Also Read: Time To Change Your Wi-Fi Password To Something More Complex & Memorable
How To Backup The Existing Credentials Using Credential Manager In Windows 11/10?
If you want to save a backup of the collection of all the usernames and passwords stored in your Windows 10 computer, then you can take a backup and store it somewhere safe. This backup can then be restored on the same computer after a format or to another computer. Here are the steps for creating a backup of the existing credentials:
Step 1. Open Control Panel and click on User Accounts.
Step 2. Locate and select the Credential Manager and then click on Windows Credentials Tab.
Step 3. Click on the Back Up credentials option and then click on the browse button to choose the location to save the backup file.
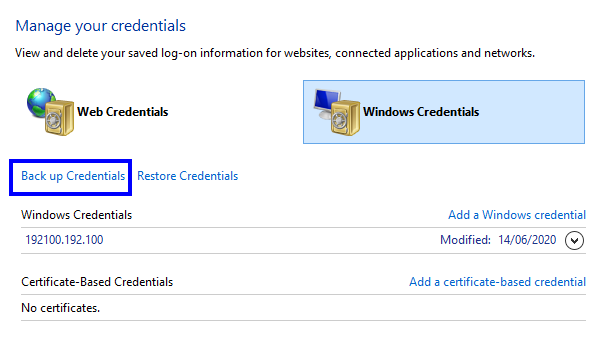
Step 4. Select a name and enter before “.crd” to name the backup and click on the Save Button.
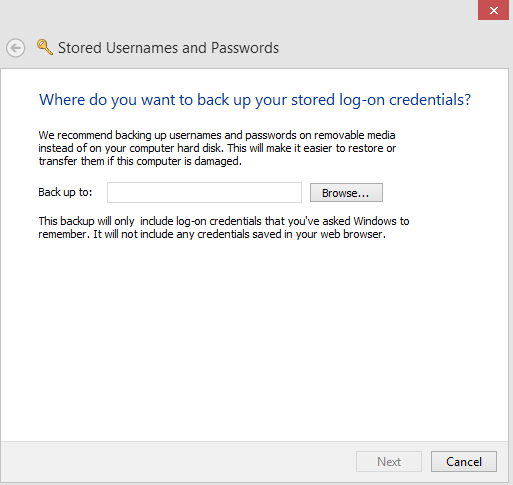
Step 5. Click the Next button and then a prompt will appear asking you to press the Ctrl + Alt + Delete keys on your keyboard at the same time.

Step 6. Next, specify a username and password to protect this file and click on the Next button. It is mandated to enter the credentials and finally click on Finish.
Note: The backup file will be known as.CRD file and will be saved in the specified location.
Also Read: How To Import Passwords To Chrome Browser?
How To Restore Existing Credentials Backup Using Credential Manager In Windows 11/10?
As specified earlier, Window Credential Manager can import a backup taken on the same machine or a different one. These steps will guide to use of an existing backup file:
Step 1. Open Control Panel and click on User Accounts.
Step 2. Click on Credential Manager and choose the Windows Credentials tab.
Step 3. Next, click on the Restore Credentials option and then click on Browse.
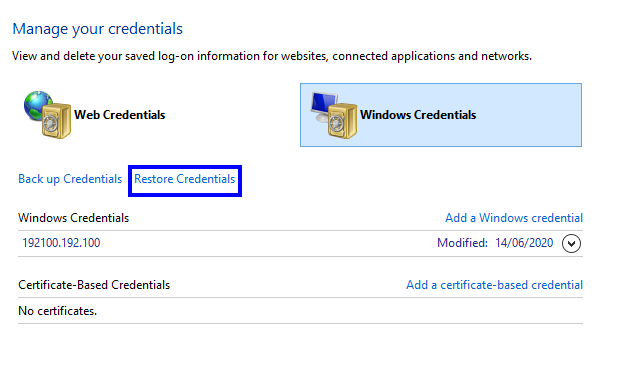
Step 4. Select the.CRD file from which you want to restore all the credentials.
Step 5. Now click on Open and then click on Next.
Step 6. Press Ctrl + Alt + Delete keys on the keyboard and then type the password to continue.

Step 7. Finally, Click on Next and then Finish.
That’s all. Now you will be able to see all your usernames and password set up in the Windows Credential Manager without having to enter every credential manually.
Also Read: How to Quickly and Easily Find Wi-Fi Password on Windows 10
The Final Word On How To Use The Credential Manager In Windows 10
The Credential Manager in Windows 10 has been around for a long time, and like many other features, it is also one of the most underrated features. The design and the functionality of the app have not changed for a long time, which means these steps would also work on the Windows Credential Manager in Windows 8 and 7. Storing the credentials on a piece of paper or diary is no longer safe. It is better to maintain a backup of your usernames and passwords through the.CRD file created by the Credential Manager in Windows 10.
Follow us on social media – Facebook, Twitter, Instagram, and YouTube. For any queries or suggestions, please let us know in the comments section below. We would love to get back to you with a solution. We regularly post tips and tricks, along with answers to common issues related to technology.
RECOMMENDED READS:


 Subscribe Now & Never Miss The Latest Tech Updates!