
I bet you do not know all this is possible with your Mac.
I have been using Mac for long but still some of its features surprise me whenever I come across them. Mac is amazing and much more advanced than the average system as far as performance goes. It has some hidden features you should know about to utilize your Mac more efficiently
So, here are some Mac tips, tricks and timesavers that you might like and they will make using Mac even more amazing. All these features are ‘hidden’ in your Mac. You do not need any additional software to use them.
1. Merging folders

You can easily merge two folders by using the hidden Merge option. To access it, hold down the option key, as you drag-and-drop a folder into the same location. You will see a dialogue box with a Merge button. Click on Merge folders to complete the task. Once you do that, a new folder will be created with both the source and destination folders.
2. Sign PDFs within preview

Mac has a very handy feature which makes signing digital documents easy, without having digital signature. To sign, you need to have a Mac laptop or Magic Trackpad or you just need to sign on a white paper hold it in front of the system camera, line it up and click Accept.
The other way is to drag a PDF into the email you’re sending. Hover over the PDF file at top right corner and you will see a little button, click on it to get range Markup option, including one for signing documents.
To save signatures for future, click on “Save this signature for use after Preview quits”.
3. Quick access to dictionary

Many a time, while reading something we want to know the meaning of a word or its definition but to check that we don’t wish to open web browser and search for what it really means.
Mac knows it all and has made it easy for you. You can access the dictionary with a gesture route. You just need to hover over the word and tap your trackpad once with three fingers simultaneously, to open the dictionary. To check if the feature is enabled, hit the “Trackpad” Preference Pane in System Preferences. Check for it in the “Point & Click” tab. It should be the third item in the list.
4. Translate to and from Spanish, German, etc

The Dictionary is not only limited to your own language, you can even use it for translation. To do so open the Dictionary app by searching for it in Spotlight, cmd+Space, now open the Preferences panel via Cmd +, now select the languages you want.
To open Spotlight, click the magnifying glass icon in the upper-right corner of the menu bar, or press Command-Space from any app.
You can add the commonly used language like Spanish/English dictionary, to make translations easy when you are writing in Spanish.
Once the Spanish dictionary is activated, you can look up any word in most apps by right-clicking it and selecting the ‘Look Up’ option, or by hovering the mouse cursor over it and tapping Ctrl+Cmd+D.
Also Read: How to Find and Remove Duplicate Photos on a Mac
5. Restoring scrollbars

When the content doesn’t fit into the size of the page, the scroll bar helps you to see the complete text by navigating up and down. But it seems Mac is missing these scroll bars. No, it is not the case they are present but hidden. You just need to follow certain steps to make them visible.
- Click the Apple menu at the top-left of the screen, then select System Preferences.
- Next, select the General preferences pane; it’s the very first one, up at the top.
- Under the “Show scroll bars” heading, you’ll find three options: “Automatically based on input device,” “When scrolling,” and “Always.”
- Go ahead and select that last “Always” option. You’re done!
6. Built in emoji

We use emoji to express emotions, ideas thoughts on our iphone but you can do the same on Mac, with some quick taps on the keyboard button.
- Position the cursor on any text field in which you’d like to insert an emoji.
- Now, press the Commandand Control keys on your keyboard. Then press the space bar, to launch the characters palette.
- Click on the Emojiicon in the sidebar on the left side of the Character window.
There are various emojis divided into several categories: Smileys & People, Animals & Nature, Food & Drink, Activity, Travel & Places, Objects, Symbols, and Flags.
- Double-click on the emoji you’d like to use and it’ll be inserted where your cursor is pointing.
- When you’re done, close it by clicking the red close window
7. Speech to text conversion
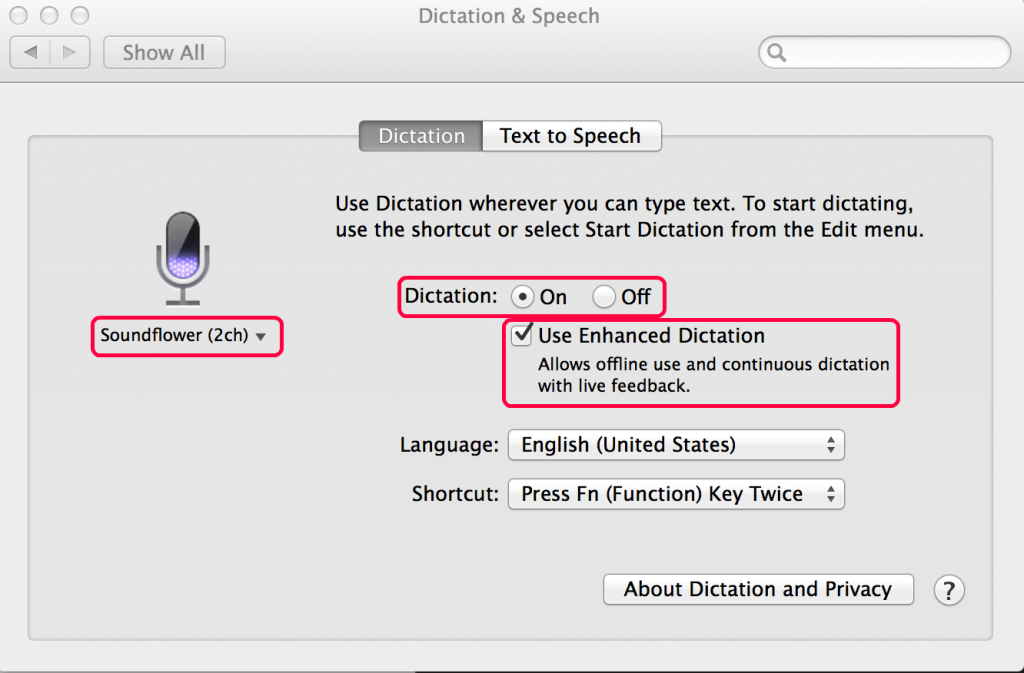
Dictation works unexpectedly well on Mac OS. You just need to press the function (fn) key twice and start speaking. To convert speech to text just press fn one more time.
The surprise doesn’t end here. There is another feature called Enhanced Dictation. This feature not only lets you use all dictation features offline, but also get live feedback, do edits while recording, and then continue dictating your text. It is much faster, you can dictate longer sentences in a single go. But there is a catch. The offline dictation pack is around 700MB, so you’ll need to have space available on your Mac.
To enable Enhanced Dictation simply go to your Settings > Dictation & Speech, and then check the box Use Enhanced Dictation. auto
8. Auto-complete of words

No matter how good you are with words, spelling them can get confusing. This feature helps in auto correction of misspelled words. To get the auto-complete menu, press F5 or Option + Escape.
When we use iPhone or iPad, the first word of a sentence is automatically capitalised, and a full stop is added automatically after space is pressed twice. But need to enable this feature. To do so, go to System Preferences > Keyboard > Text, and select: ‘Capitalize words automatically’, and ‘Add period with double-space’.
9.Making copy of an open file

To make copy of an open file, you do not have to look for a ‘Save As’ option like you do in Windows. To make a copy, you need to click on the file name. You will see a drop-down menu and an option copy, by selecting that option you can replicate a file.
Also Read: Best EXIF Data Editor for Mac: Photos Exif Editor
10. Free up RAM by shutting down running apps

We need RAM for optimized use of MAC. To free up RAM space by closing running apps just hold Command+Option+Escape it will bring up Force Quit window. Select the app that you wish to close and by pressing Q, you can quit any app that’s running and pressing H will hide it.
11. Do not Disturb

Getting a notification each time there’s a new message or update is frustrating when we are doing some important work or relaxing. But worry not, notification center can be set to ‘Do Not Disturb’ whenever you don’t want disturbance. Once you turn it on you will not get any notifications for a day.
- Choose Apple menu > System Preferences, then click Notifications.
- Select Do Not Disturb at the top of the list on the left.
- On the right, select when to turn off all notifications.
12. Delete Apps from Launchpad

You can delete the apps from the Finder and can even do the same task from Launchpad. It shows all the apps installed on your Mac. To delete old apps in a secure and much easy manner, enter Launchpad and hold an icon until you see icons jiggle. You will see a cross next to each app. Click the X button to uninstall the app securely.
13. Preview Files
This option helps you automatically display more than one file. You can add files or pages to a document that’s already open.
You can also combine PDF files.
Set preferences for opening files
- Choose Preview > Preferences, then click General.
- Select an option for “When opening files”:
- Open all files in one window: Uses one window for all files you open in Preview, no matter when you open them.
- Open groups of files in the same window: Uses one window for each set of files you open in Preview at the same time.
- Open each file in its own window: Uses one window for each file.
Open a group of files
- To open multiple files from the Finder, select their icons (use Command-click or Shift-click), then drag them to the Preview icon, or choose File > Open With > Preview.
- To open the files from Preview, choose File > Open, then select several files or a folder.
Add files to an open document
- Choose View > Thumbnails.
- Drag the files to the window’s sidebar.
It is impossible to contain every single tip or trick in a single article. But do not worry as we will soon be back with another list, so stay tuned.
Watch this space for more such cool Mac tips and tricks.

 Subscribe Now & Never Miss The Latest Tech Updates!